Manage Single Sign-On
In the Control Center, you can configure Single Sign-On (SSO) authentication for logging in, a method that allows users to log in once and gain access to multiple applications or systems without needing to enter their credentials again. Instead of managing separate usernames and passwords for each platform, users authenticate through a single, trusted identity provider.
The Control Center supports three SSO authentication protocols:
- OpenID Connect
- SAML 2.0
- Magic Link
To access the SSO configuration section, go to  Configure>Access>SSO.
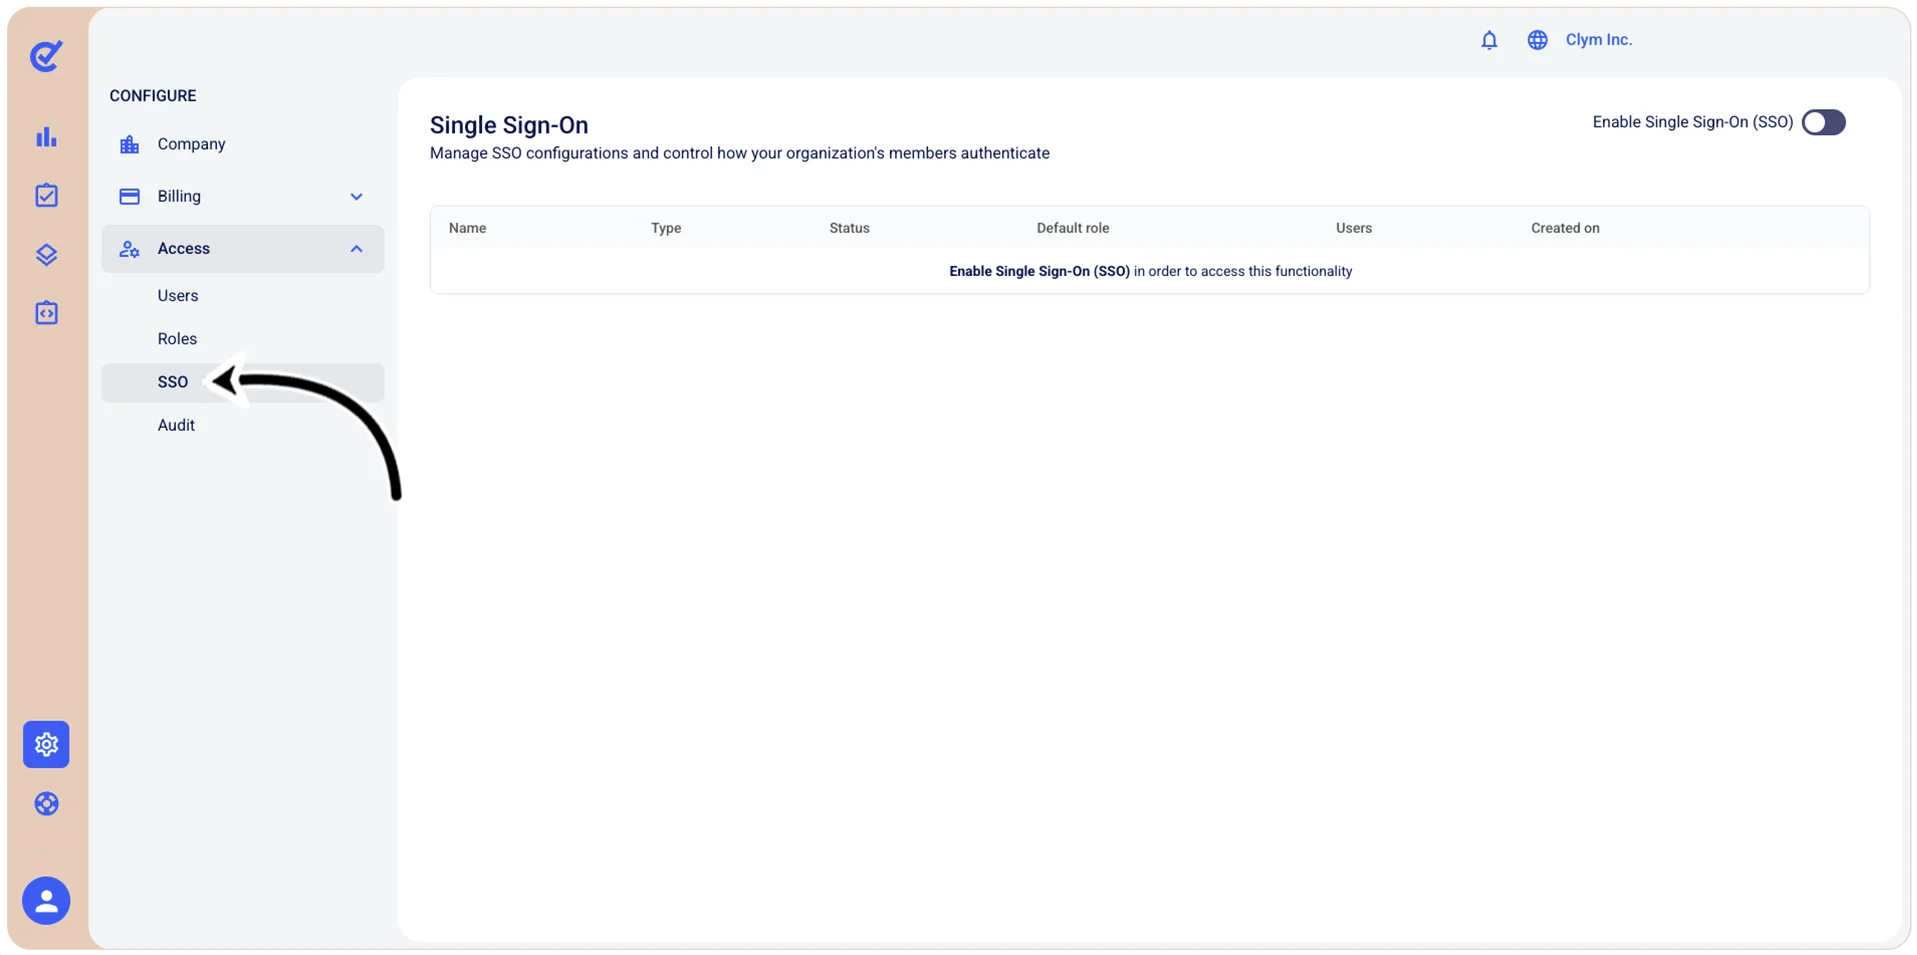
You can activate/deactivate SSO login completely, you can add, modify and delete SSO providers, and you can activate/deactivate an individual SSO provider.
To perform any SSO-related operation in the Control Center, you first need to activate SSO.
Activate SSO: Configure OpenID Connect, SAML 2.0, Magic link
In the Control Center, you can manually activate SSO using OpenID Connect, SAML 2.0, or Magic link. Depending on the SSO configuration, the options available to you may vary.
Activate SSO using OpenID Connect
In the Control Center, you can easily activate SSO using OpenID Connect.
Note: You need credentials from an OIDC provider to activate the OpenID Connect SSO.
To activate SSO using OpenID Connect:
- Go to Configure>Access>SSO.
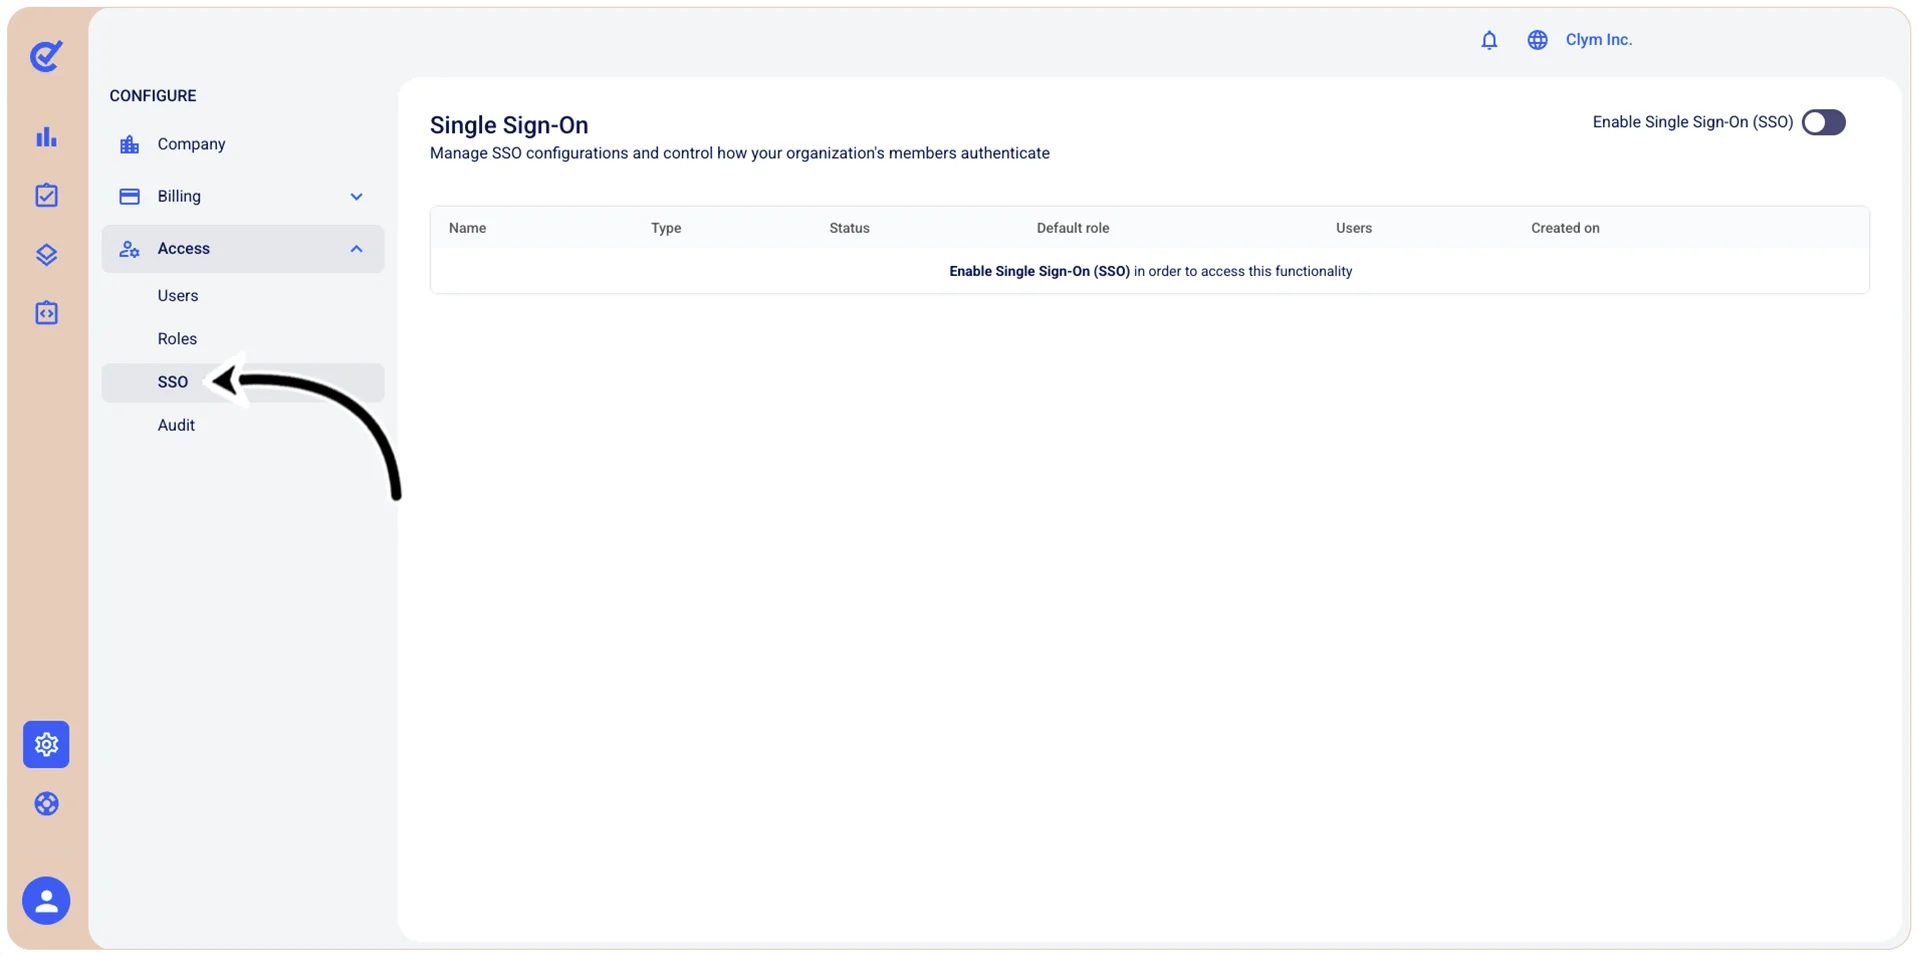
- In the Single Sign-On section, toggle on Enable Single Sign-On (SSO).
- In the Setup Single Sign-On section, configure the SSO details for OpenID Connect, as follows:
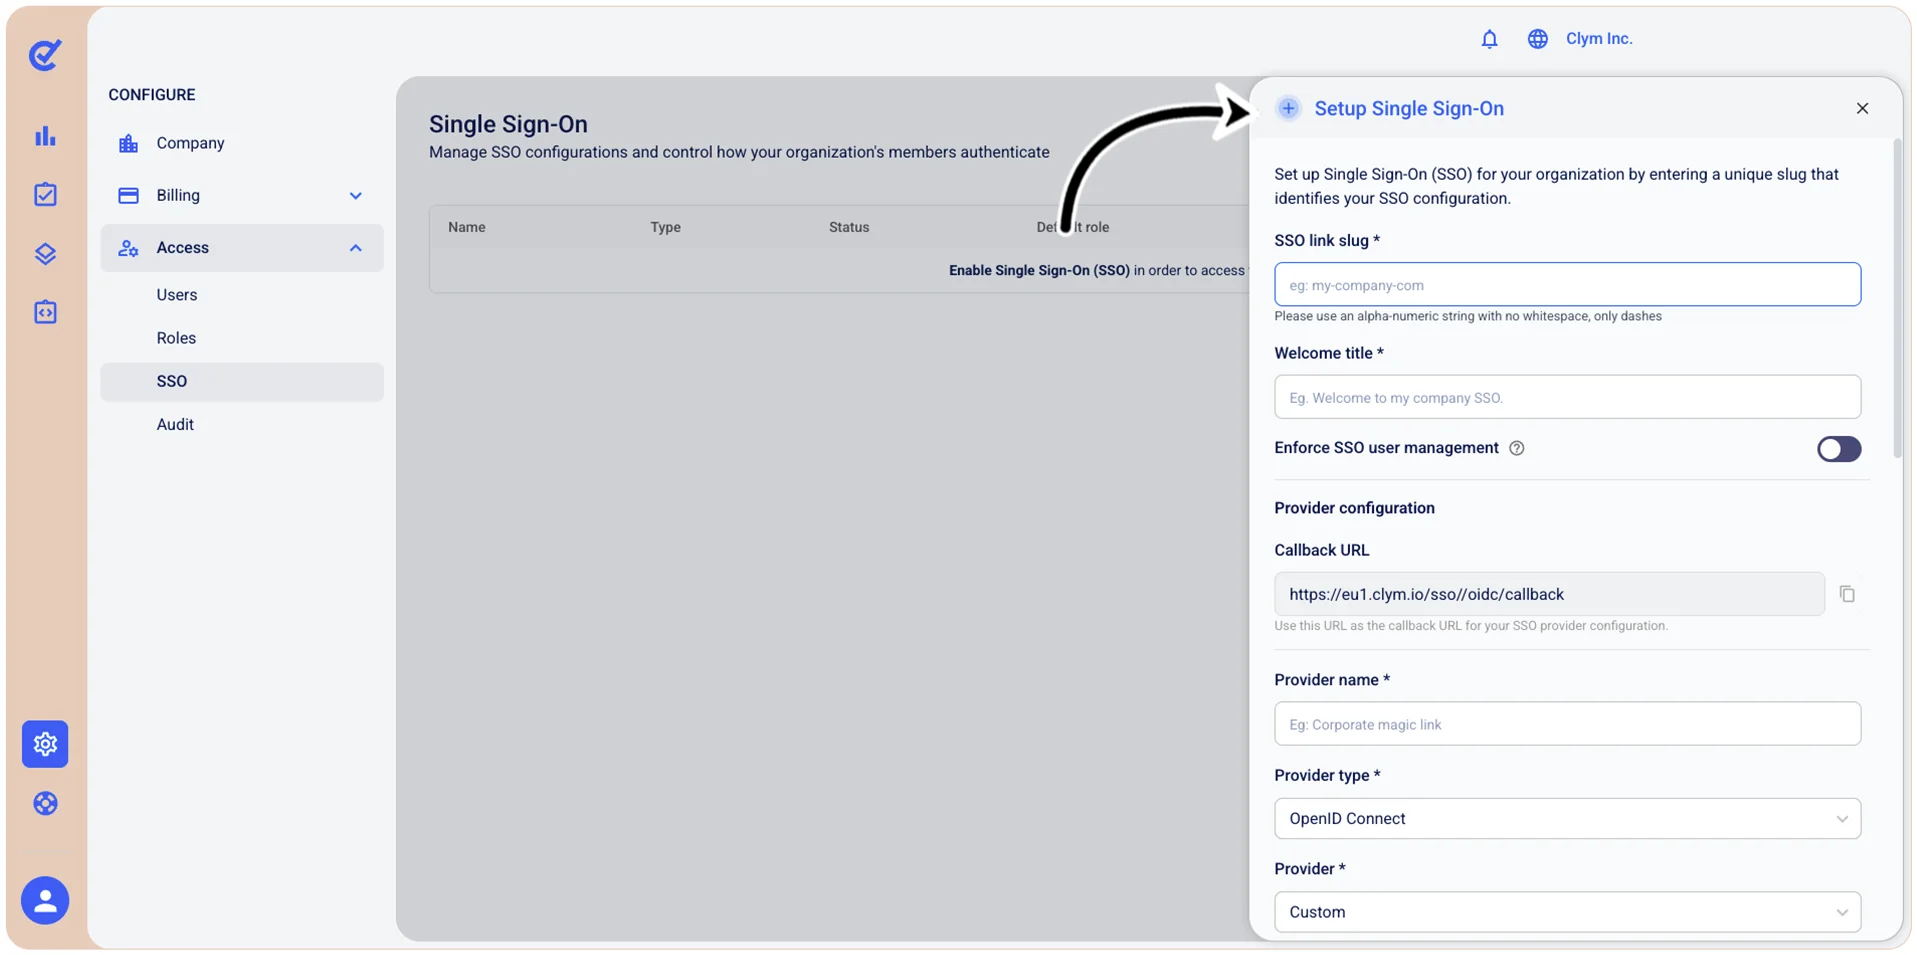
- SSO link slug*: Type the unique identifier for your SSO configuration used to build your custom SSO URL. Use alphanumeric characters and dashes only.
- SSO custom link (non editable): The URL automatically generated based on your slug, used to log in via SSO (for example, https://website.com/sso/Microsoft). Select
 Copy to copy it to your clipboard.
 - Welcome title*: Enter the heading displayed to users on the SSO login page (for example, “Welcome to my company SSO!”).
- Enforce SSO user management: When toggled on, user access is managed exclusively through SSO (except for the owners).
- Callback URL: Use this link as the callback URL. Select Copy to copy it to your clipboard.
- Provider name*: Type the name of your SSO provider.
- Provider type*: Select OpenID Connect as the authentication protocol.
- Provider*: Select the specific identity provider from the list.
- Client ID*: Enter the unique identifier assigned by your identity provider.
- Client secret*: Specify the secret key paired with the Client ID, used to authenticate the connection.
- Select
 View to reveal/hide the value.
 - Scopes*: The permissions requested from the identity provider during authentication. Type each scope and press Enter to add it.
- Issuer*: The base URL of your identity provider (for example, https://<issuername>.com).
- Authorization endpoint*: The URL where users are redirected to log in (for example, https://issuer.com/oauth2/auth).
- Token endpoint*: The URL used to exchange an authorization code for an access token (for example, https://issuer.com/oauth2/token).
- User-info endpoint: The URL used to retrieve profile information about the authenticated user (for example, https://issuer.com/oauth2/userinfo).
- Revocation endpoint: The URL used to revoke tokens when a user logs out (for example, https://issuer.com/oauth2/token/revoke).
- JWKS endpoint: The URL that provides the public keys used to verify tokens issued by the identity provider (for example, https://issuer.com/oauth2/jwks.json).
- Allowed domains*: Type the domain(s) the users of which can log in using the SSO you are configuring.
- Session duration: Define how long a user's SSO session remains active before they must re-authenticate.
- Auto-provision users: When toggled on, all user accounts can automatically log in using SSO and will have the user rights you configure as the Default role (see below). When deactivated, only manually created user accounts can log in.
- Default role: Select from the list the default role that will be assigned to auto-provisioned users. The role you select here will determine the user rights. The roles available here are the ones you configured at Manage Roles.
- When finished, select Setup to save your configuration.
Activate SSO using SAML 2.0
In the Control Center, you can easily activate SSO using OpenID Connect.
To activate SSO using SAML 2.0:
- Go to Configure>Access>SSO.
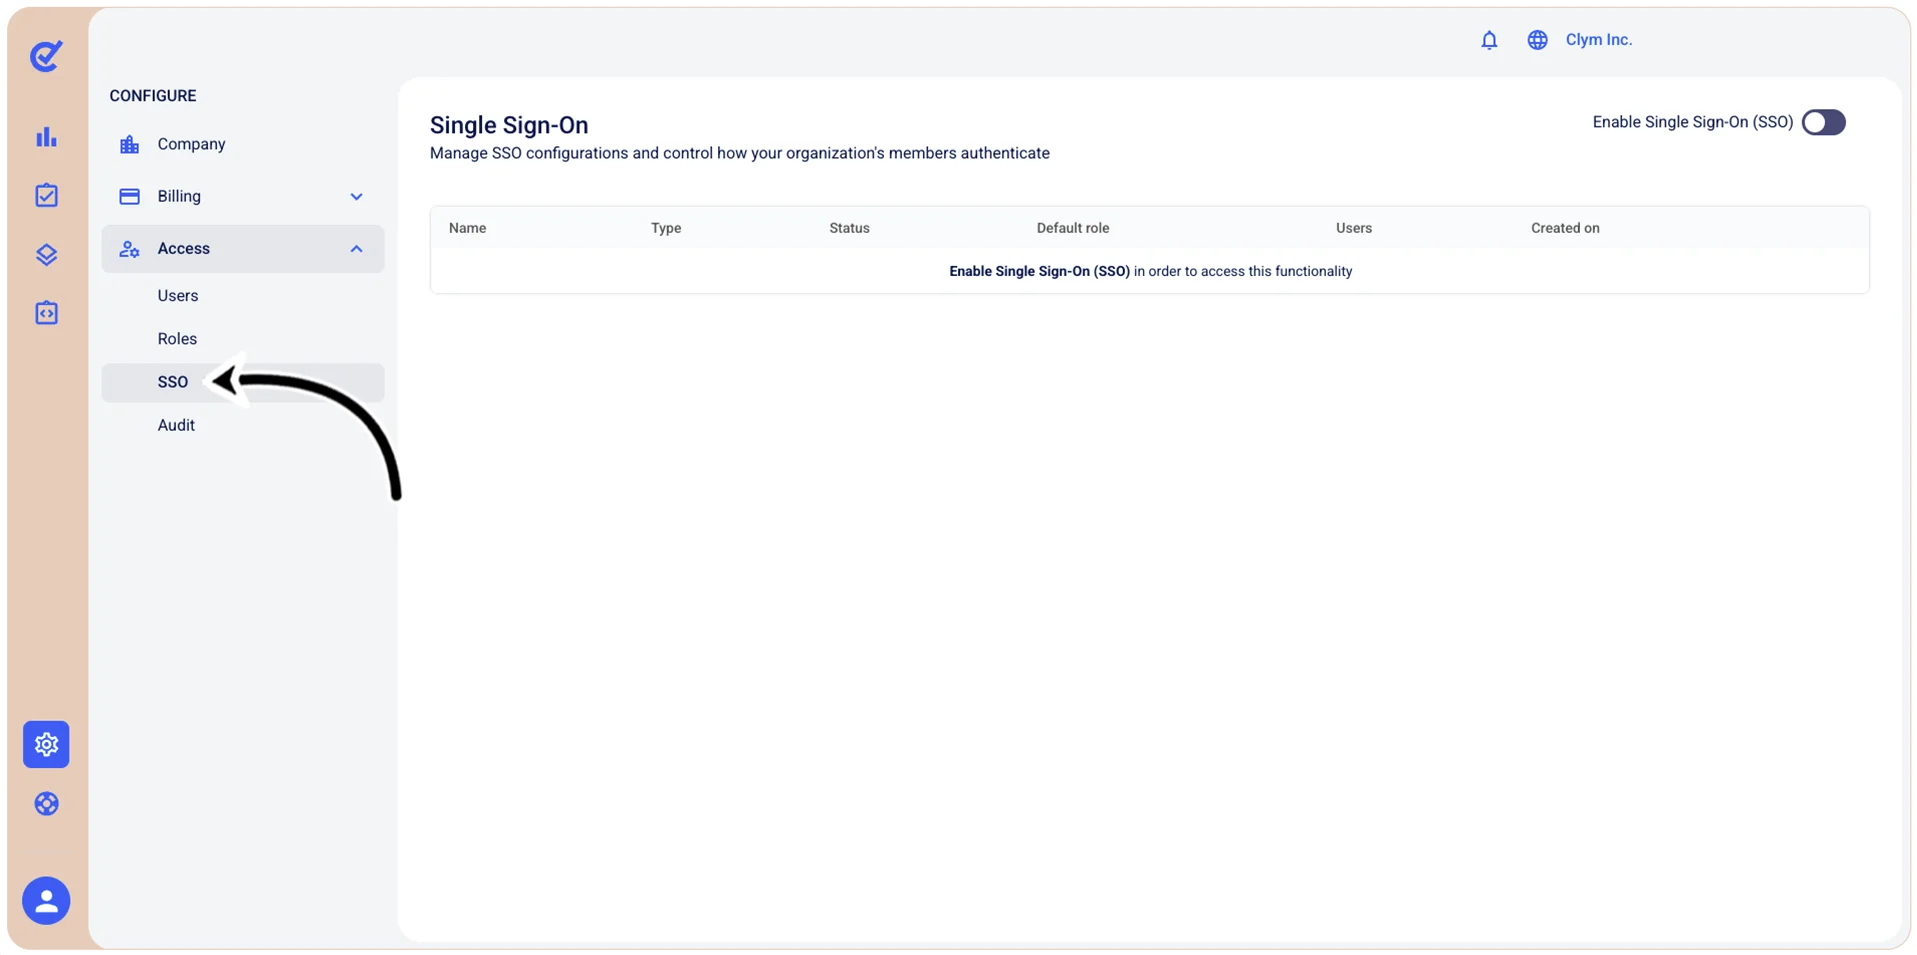
- In the Single Sign-On section, toggle on Enable Single Sign-On (SSO).
- In the Setup Single Sign-On section, configure the SSO details for SAML 2.0:
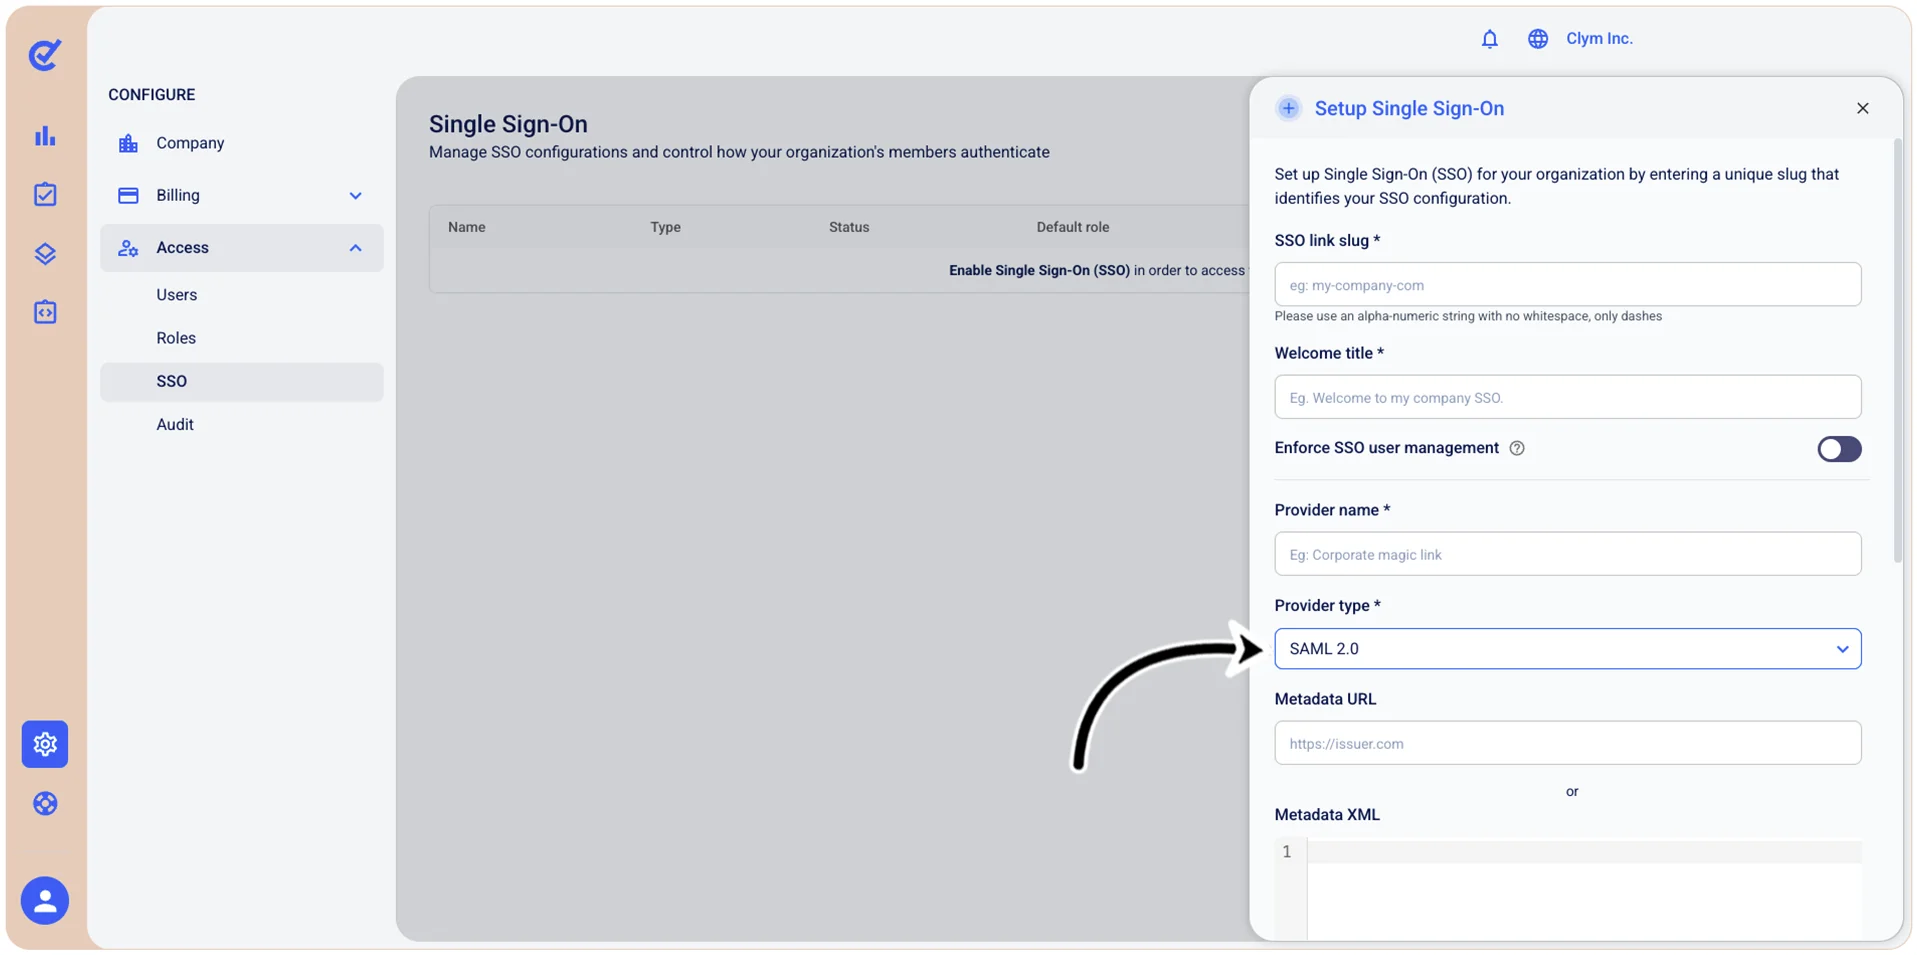
- SSO link slug*: Type the unique identifier for your SSO configuration used to build your custom SSO URL. Use alphanumeric characters and dashes only.
- SSO custom link (non editable): The URL automatically generated based on your slug, used to log in via SSO (for example, https://website.com/sso/Microsoft). Select Copy to copy it to your clipboard.
- Welcome title*: Enter the heading displayed to users on the SSO login page (for example, “Welcome to my company SSO!”).
- Enforce SSO user management: When toggled on, user access is managed exclusively through SSO (except for the owners).
- Callback URL: Use this URL as the callback URL when configuring Clym in your SSO provider. Select Copy to copy it to your clipboard.
- Provider name*: Type the name of your SSO provider.
- Provider type*: Select SAML 2.0. as the authentication protocol.
- Metadata URL: Enter the URL pointing to your identity provider's SAML metadata file (for example, https://issuer.com). Use this or the Metadata XML field below.
- Metadata XML: If your identity provider does not expose a metadata URL, paste the raw SAML metadata XML directly into this field. Use this or the Metadata URL field above.
- Custom attribute mapping: Provide a JSON file with custom attribute mapping.
- Provide custom certificates: When toggled on, it enables you to supply your own X.509 certificate and private key for signing and encrypting SAML assertions (see below).
- X.509 certificate: Paste your X.509 public certificate used to verify the identity of your service during SAML exchanges.
- X.509 private key: Paste your X.509 private key used to sign outgoing SAML requests.
- If you selected Magic link as a Provider type:
- Default role: Select from the list the default role that will be assigned to auto-provisioned users. The role you select here will determine the user rights. The roles available here are the ones you configured at Manage Roles.
- Allowed domains*: Type the domain(s) the users of which can log in using the SSO you are configuring.
- Session duration: Define how long a user's SSO session remains active before they must re-authenticate.
- When finished, select Setup to save your configuration.
Activate SSO using Magic link
In the Control Center, you can easily activate SSO using Magic link.
To activate SSO using Magic link:
- Go to Configure>Access>SSO.
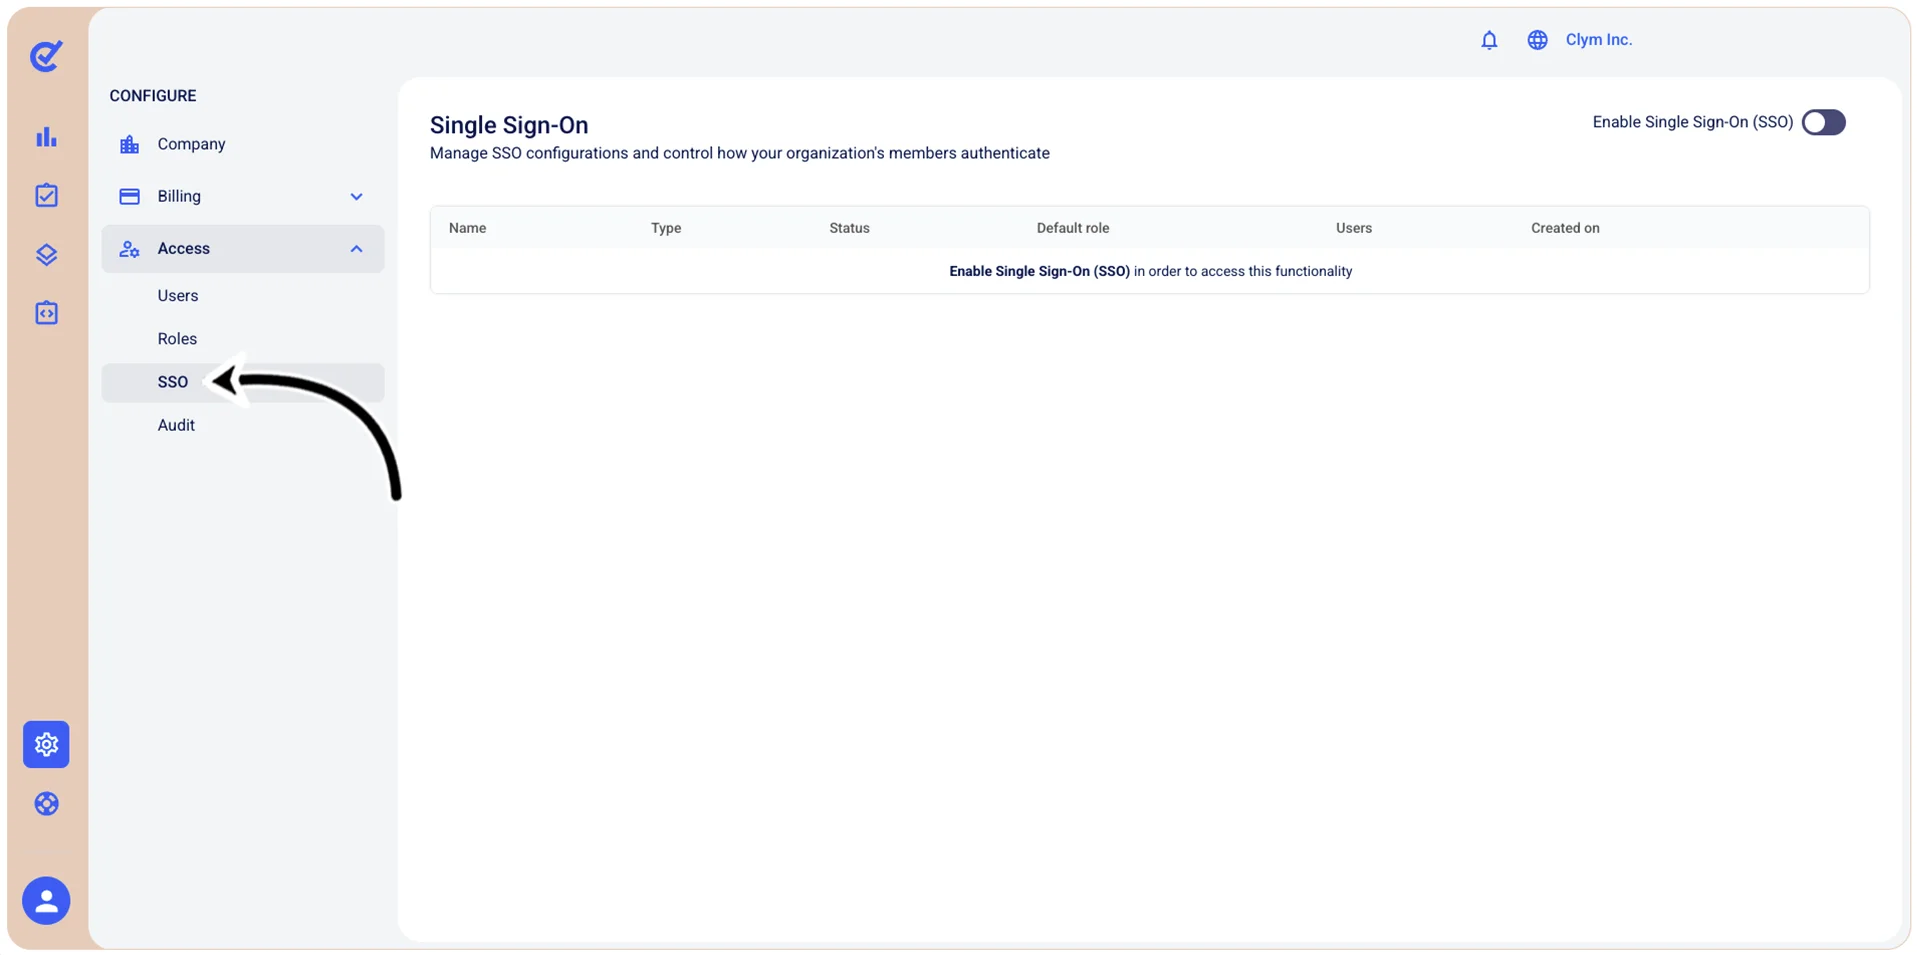
- In the Single Sign-On section, toggle on Enable Single Sign-On (SSO).
- In the Setup Single Sign-On section, configure the SSO details for Magic link, as follows:
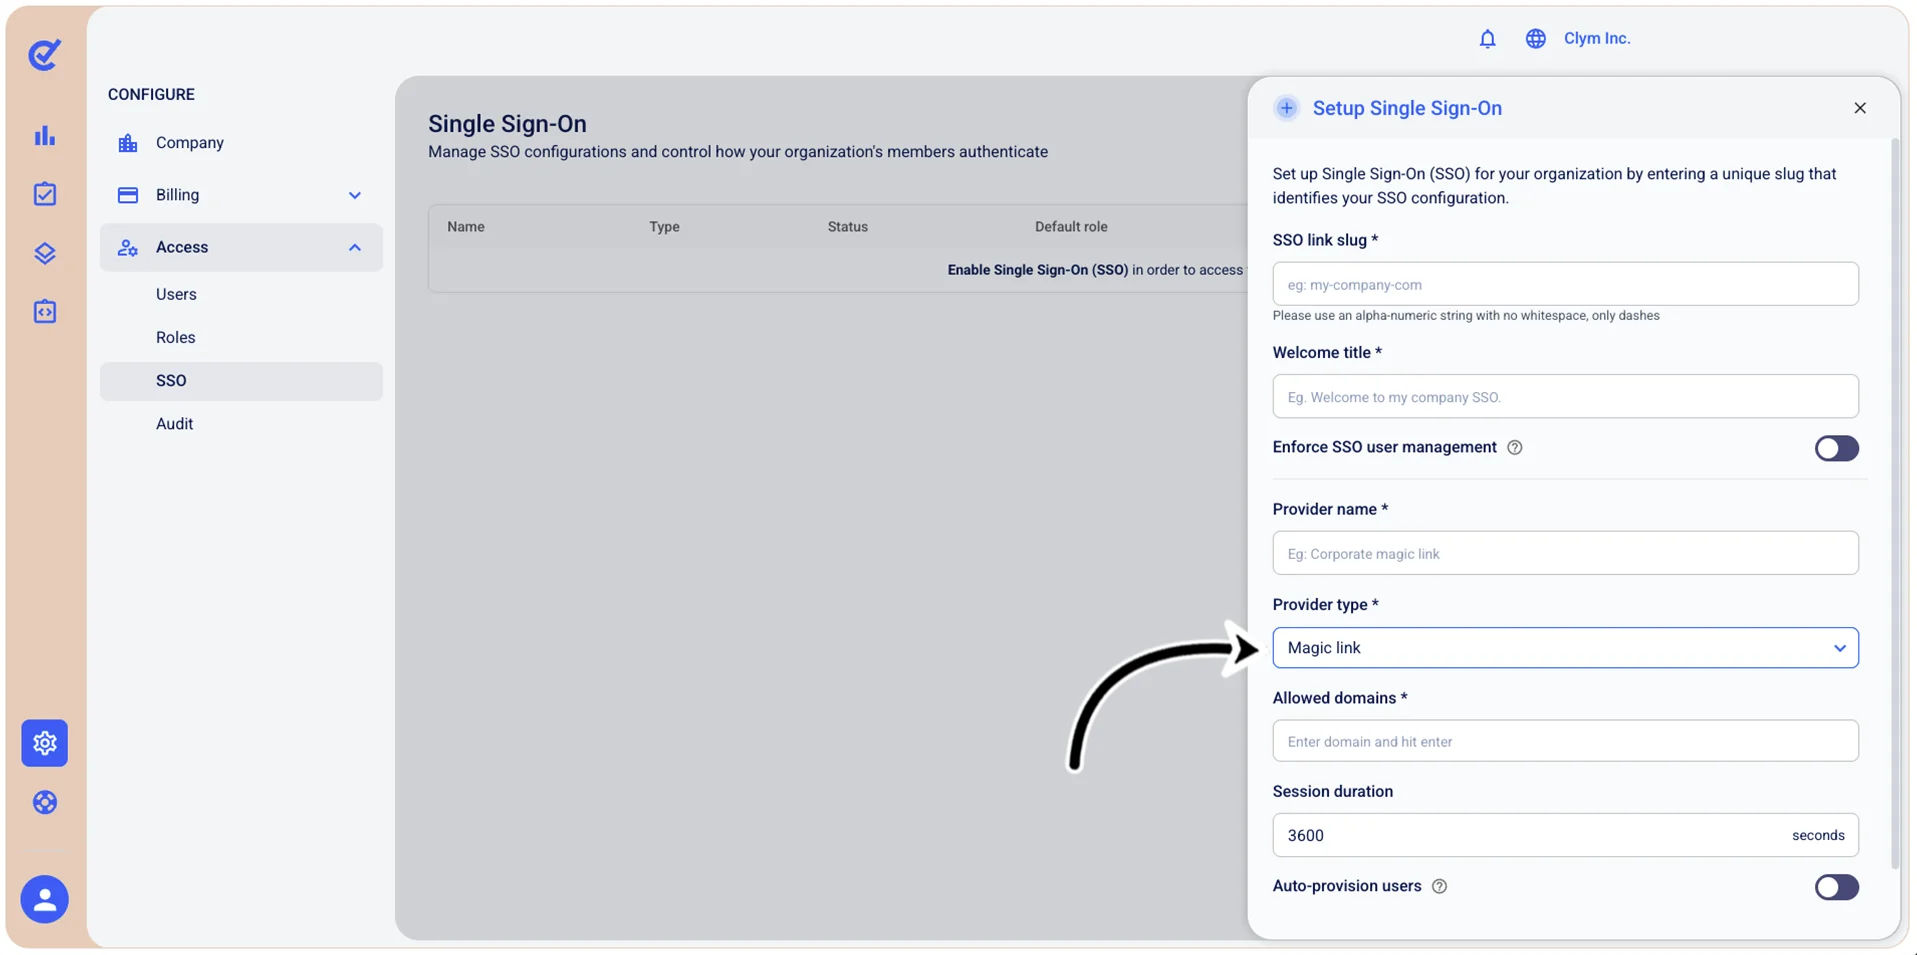
- SSO link slug*: Type the unique identifier for your SSO configuration used to build your custom SSO URL. Use alphanumeric characters and dashes only.
- SSO custom link (non editable): The URL automatically generated based on your slug, used to log in via SSO (for example, https://eu1.clym-stage.com/sso/Microsoft).
- Click the Copy icon to copy it to your clipboard.
- Welcome title*: The heading displayed to users on the SSO login page (for example, “Welcome to
SSO!”). - Enforce SSO user management: When toggled on, user access is managed exclusively through SSO (except for the owners).
- Provider name*: Type the name of your SSO provider.
- Provider type*: Select the authentication protocol used by your identity provider from the list: OpenID Connect, SAML 2.0, Magic link.
- Allowed domains*: Type the domain(s) the users of which can log in using the SSO you are configuring.
- Session duration: Define how long a user's SSO session remains active before they must re-authenticate.
- Auto-provision users: When toggled on, all user accounts can automatically log in using SSO and will have the user rights you configure as the Default role (see below). When deactivated, only manually created user accounts can log in.
- Default role: Select from the list the default role that will be assigned to auto-provisioned users. The role you select here will determine the user rights. The roles available here are the ones you configured at Manage Roles.
- When finished, select Setup to save your configuration.
If you selected Magic link SSO, the login URL is displayed in the Single Sign-On section. You can Copy it (and send it to other users to log in to the Control Center) or you can quickly Configure it.
Deactivate SSO: OpenID Connect, SAML 2.0, Magic link
In the Control Center, you can completely disable SSO based on OpenID Connect, SAML 2.0, Magic link using a simple procedure.
Note: Deactivating SSO permanently deletes all existing SSO provider configurations, so make sure you have saved any provider settings you may need to reconfigure in the future.
To deactivate SSO-based login:
- Go to Configure>Access>SSO.
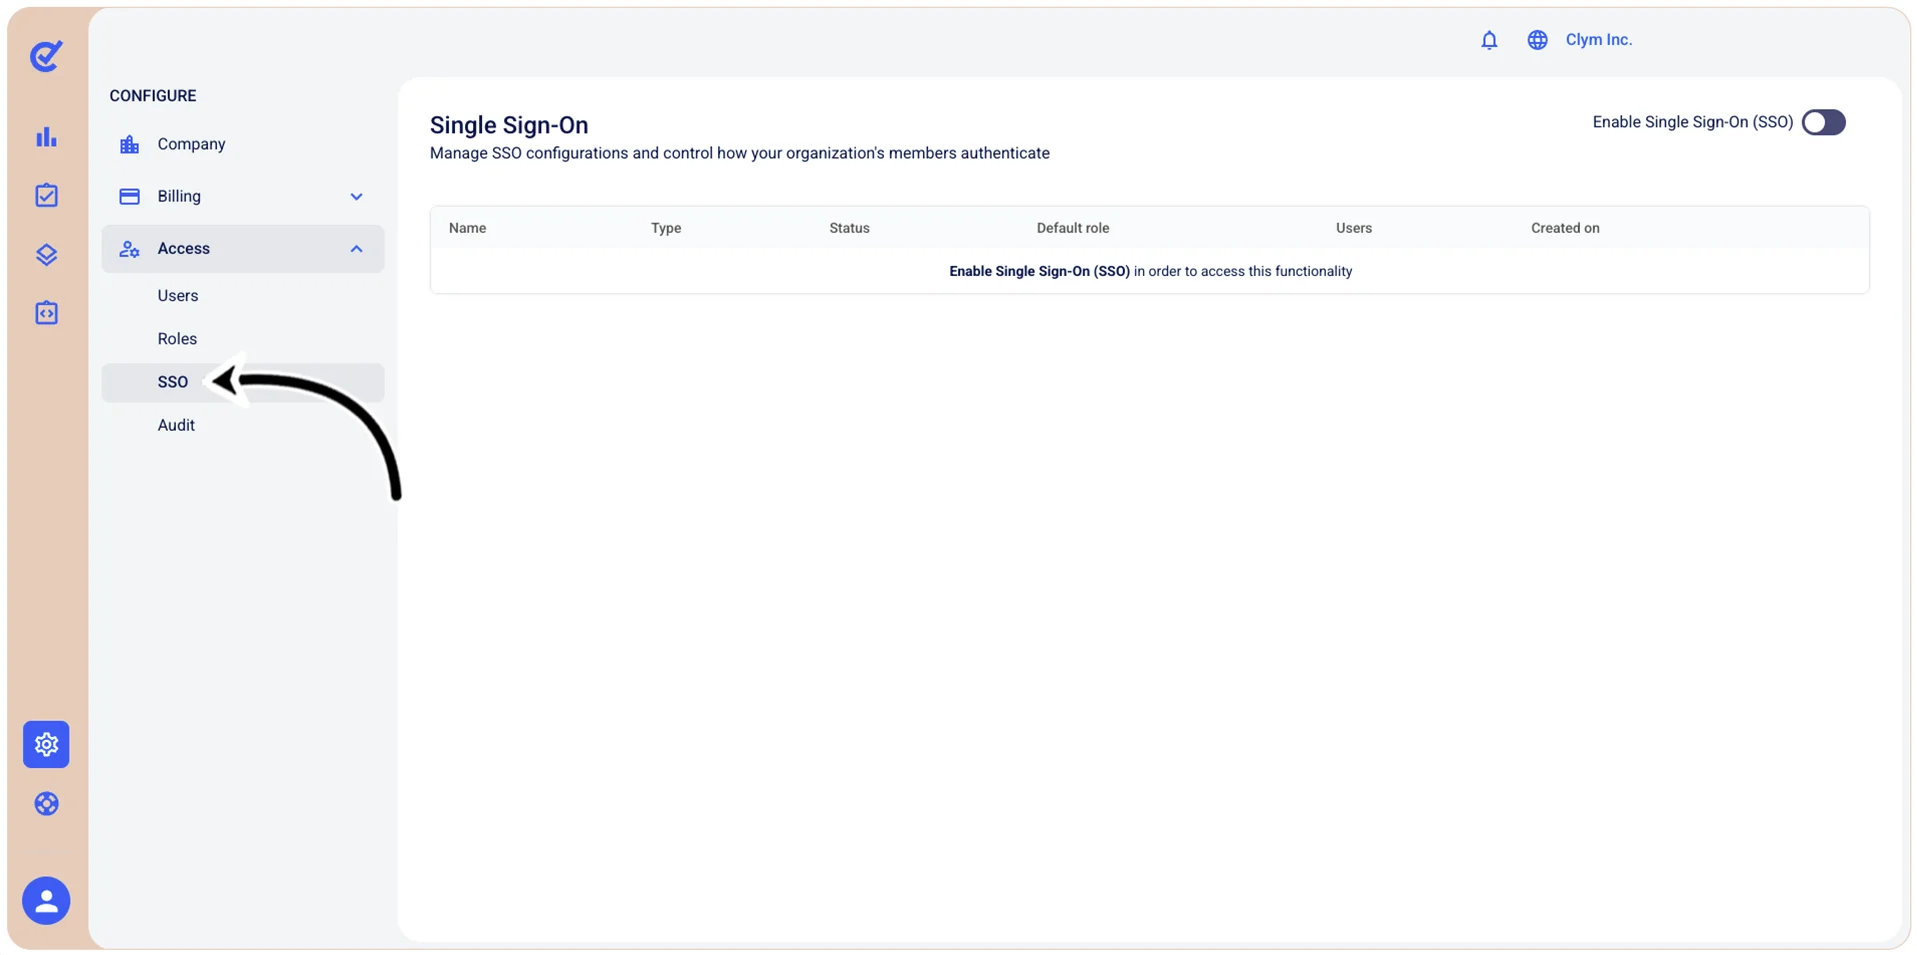
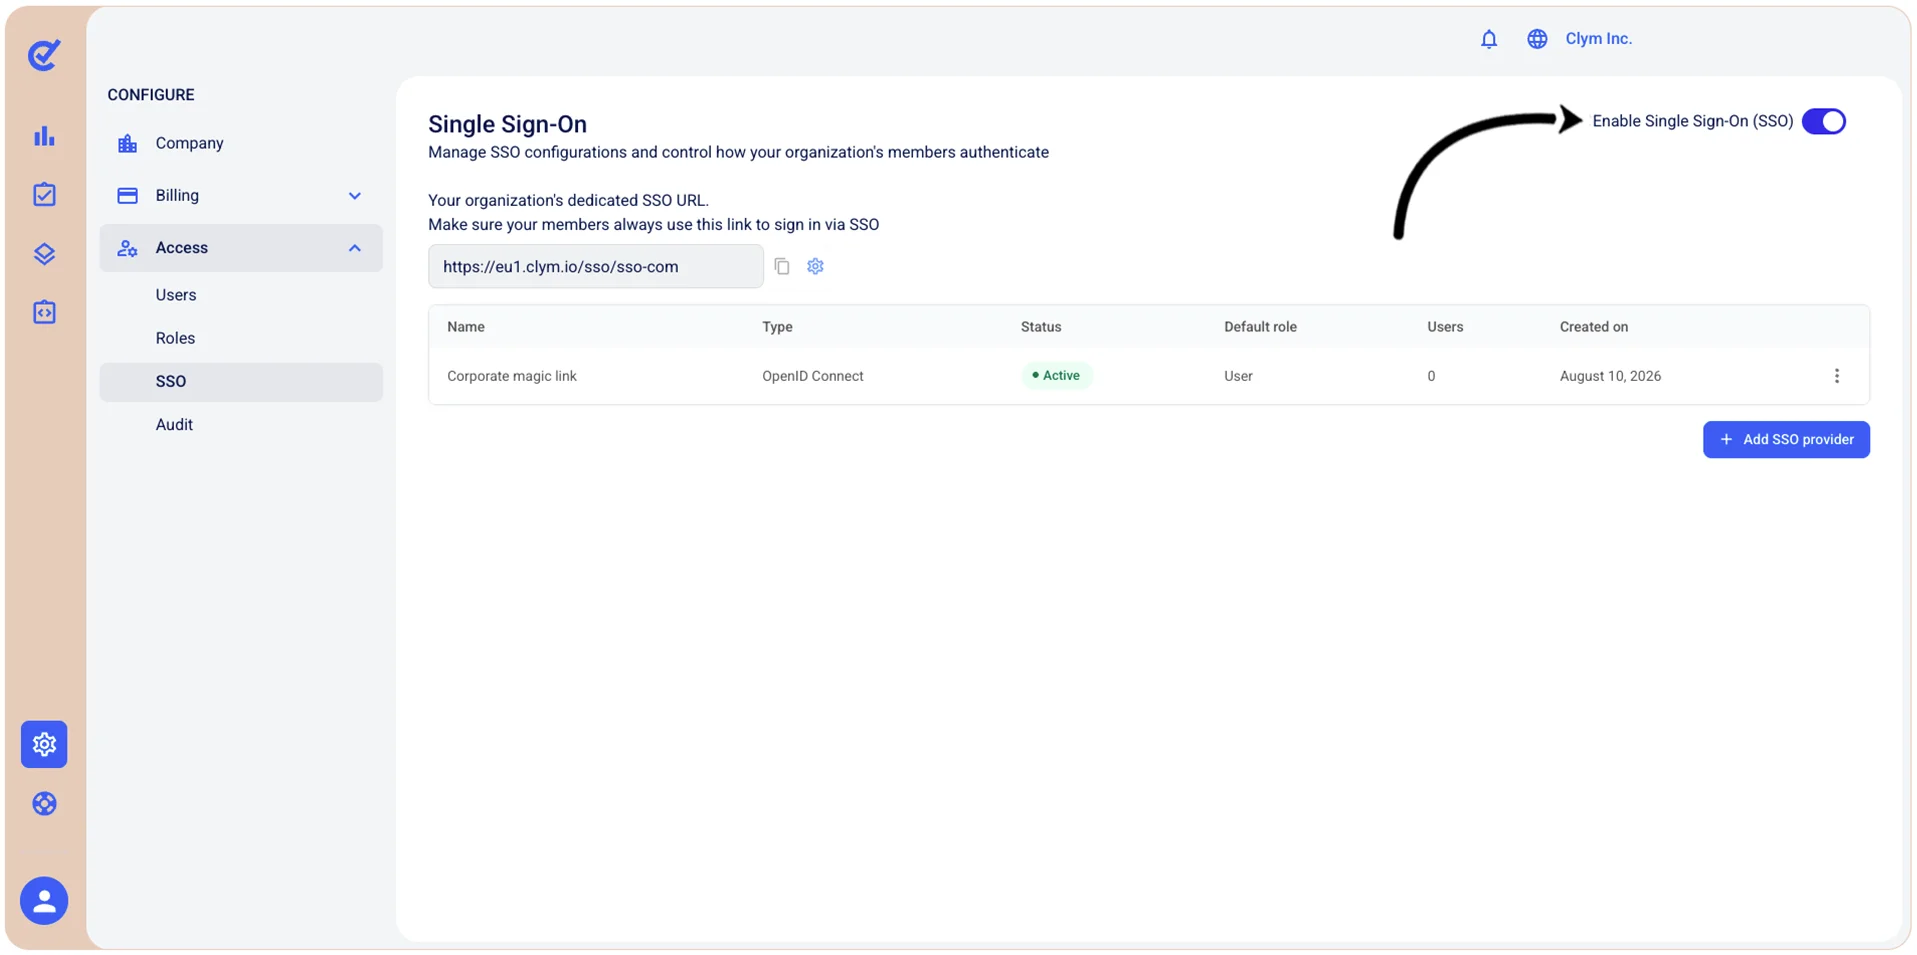
- In the Single Sign-On section, toggle off Enable Single Sign-On (SSO).
- In the confirmation message, select Confirm.
Add an SSO provider: OpenID Connect, SAML 2.0, Magic link
In the Control Center, you can easily add an SSO provider SSO using OpenID Connect, SAML 2.0, or Magic link. Every SSO provider requires its own parameters, but some configurations are identical.
Note: To be able to add an SSO provider, you need to have already configured the SSO parameters.
To add an SSO provider:
- Go to Configure>Access>SSO.
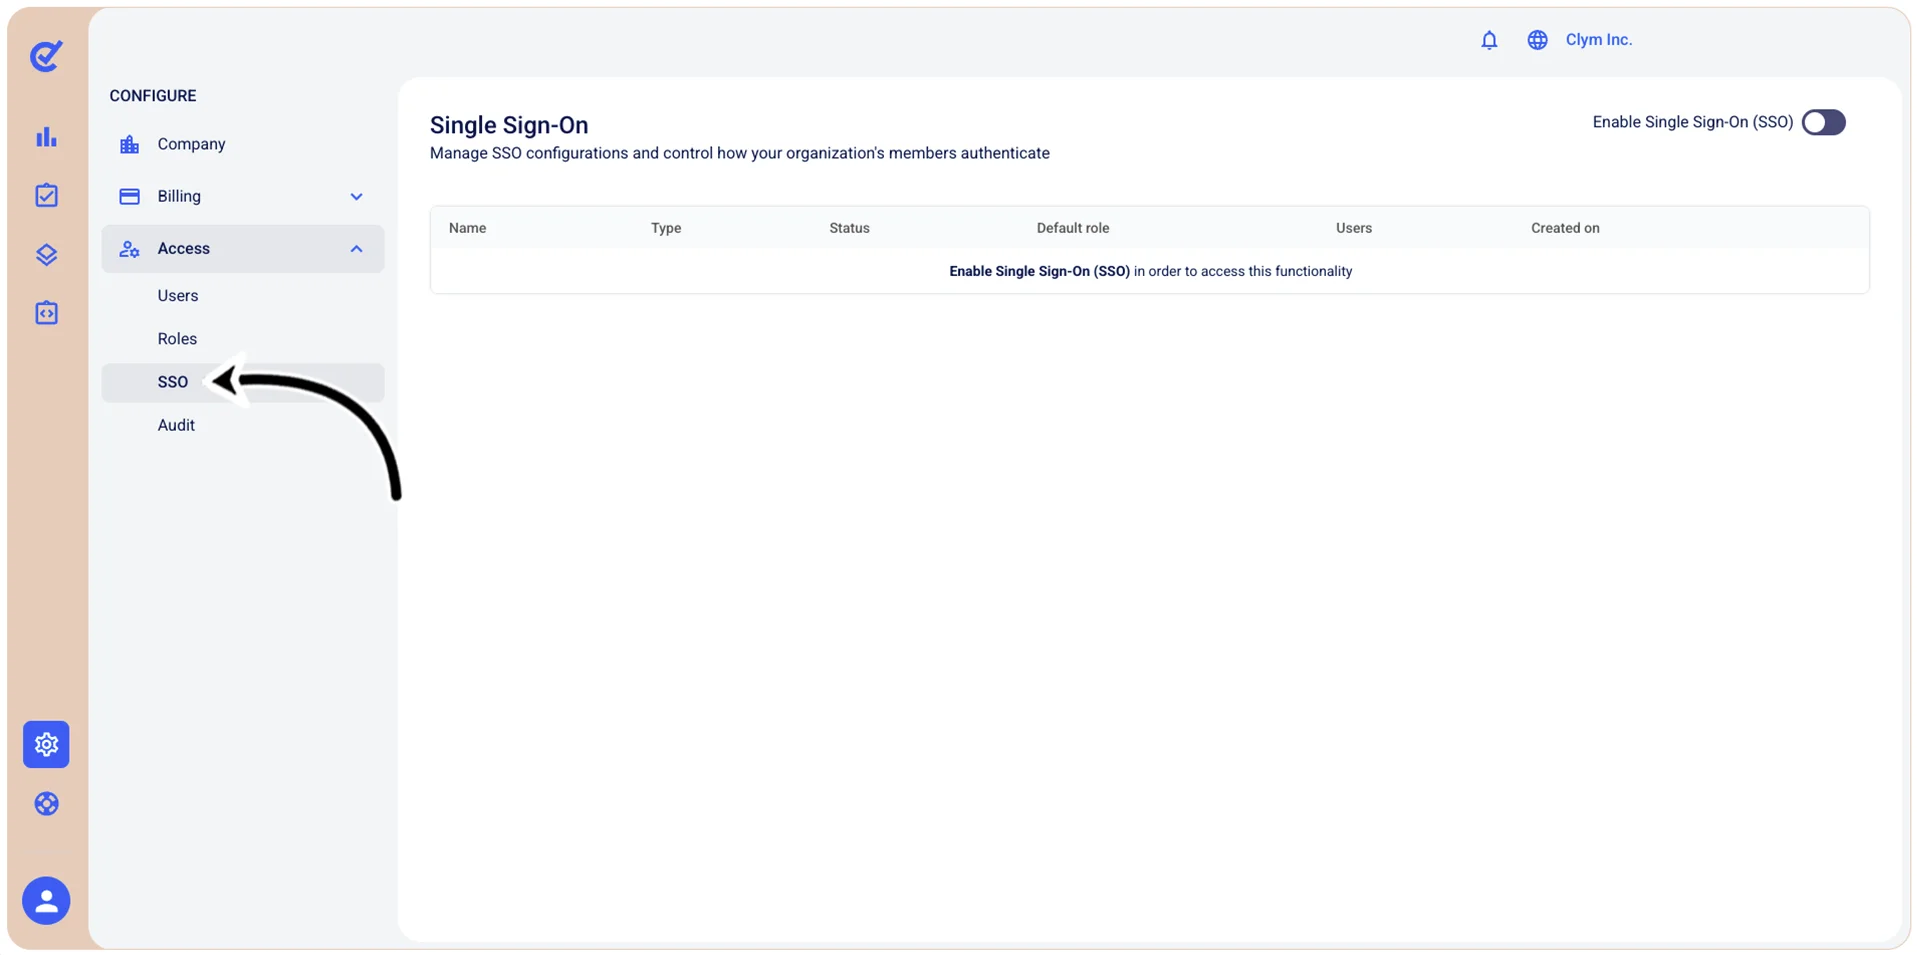
- In the Single Sign-On section, select +Add SSO provider.
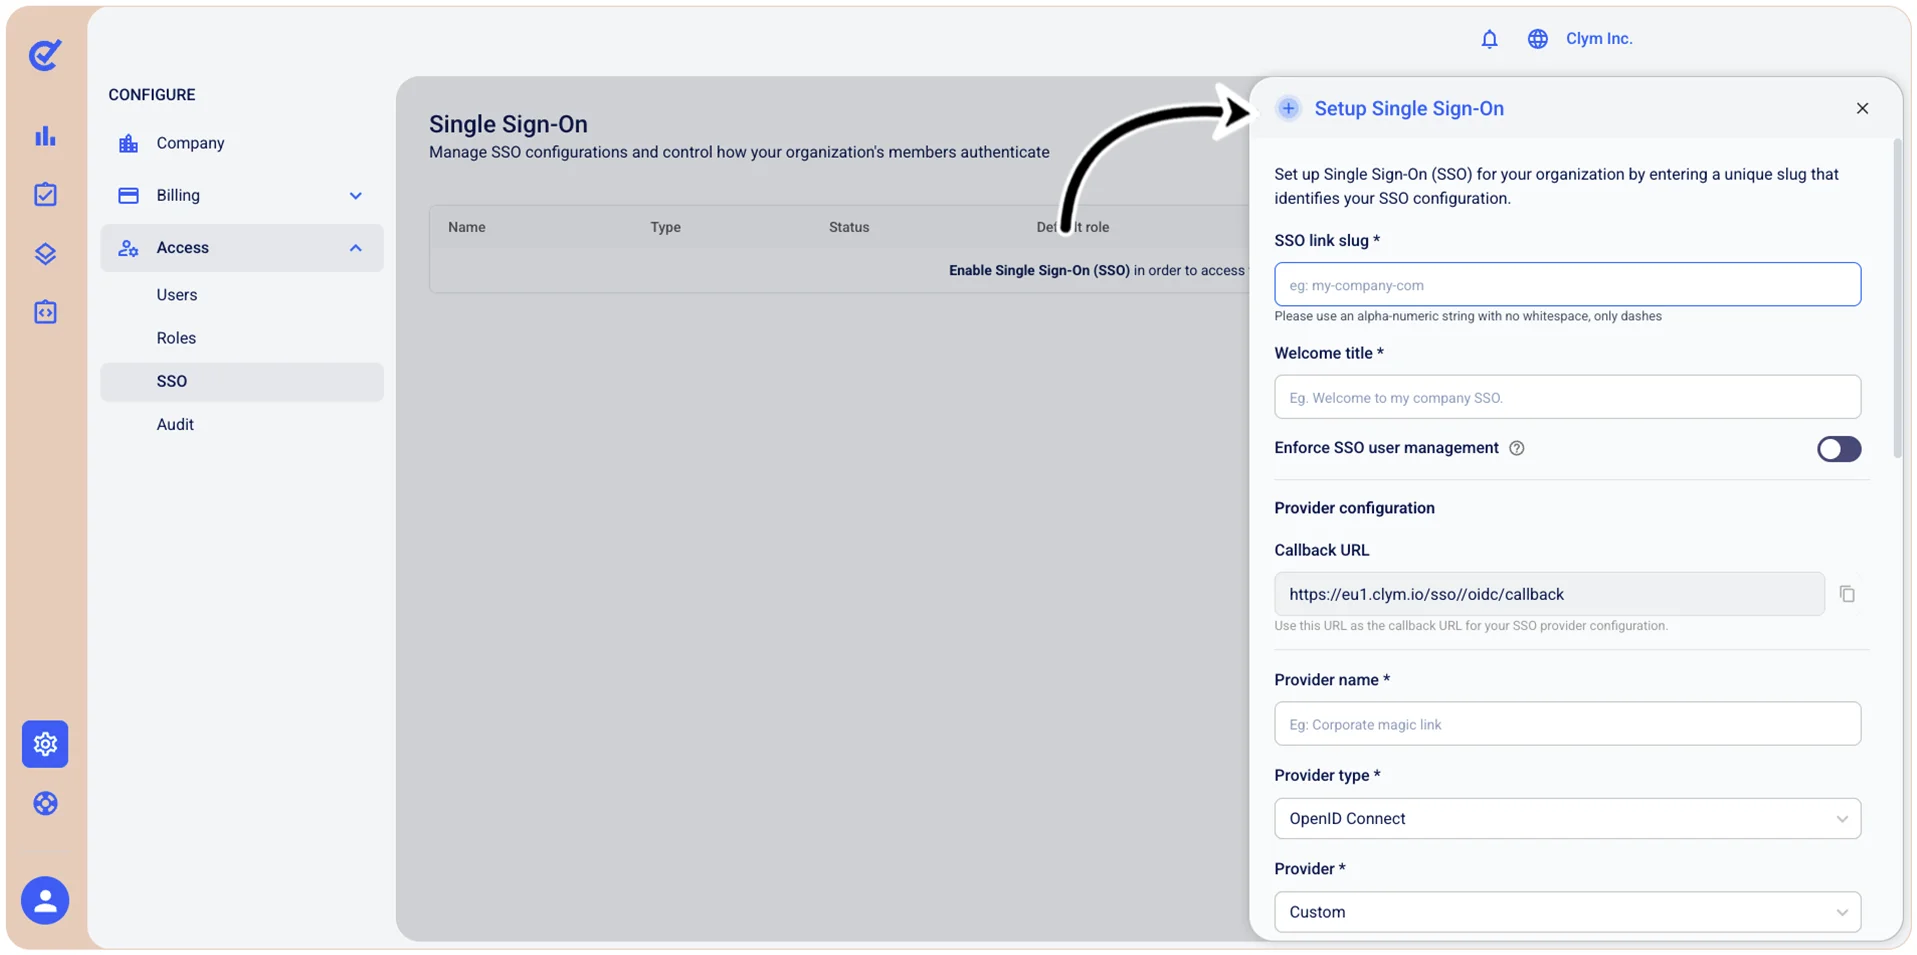
- In the Configure SSO provider section, set up the parameters of your SSO connection: OpenID Connect, SAML 2.0, or Magic link.
Add an OpenID Connect SSO provider
In the Control Center, you can easily activate SSO using OpenID Connect.
Notes:
- You need credentials from an OIDC provider to activate the OpenID Connect SSO.
- To be able to add an SSO provider, you need to have already configured the SSO parameters.
To add an OpenID Connect SSO:
- Go to Configure>Access>SSO.
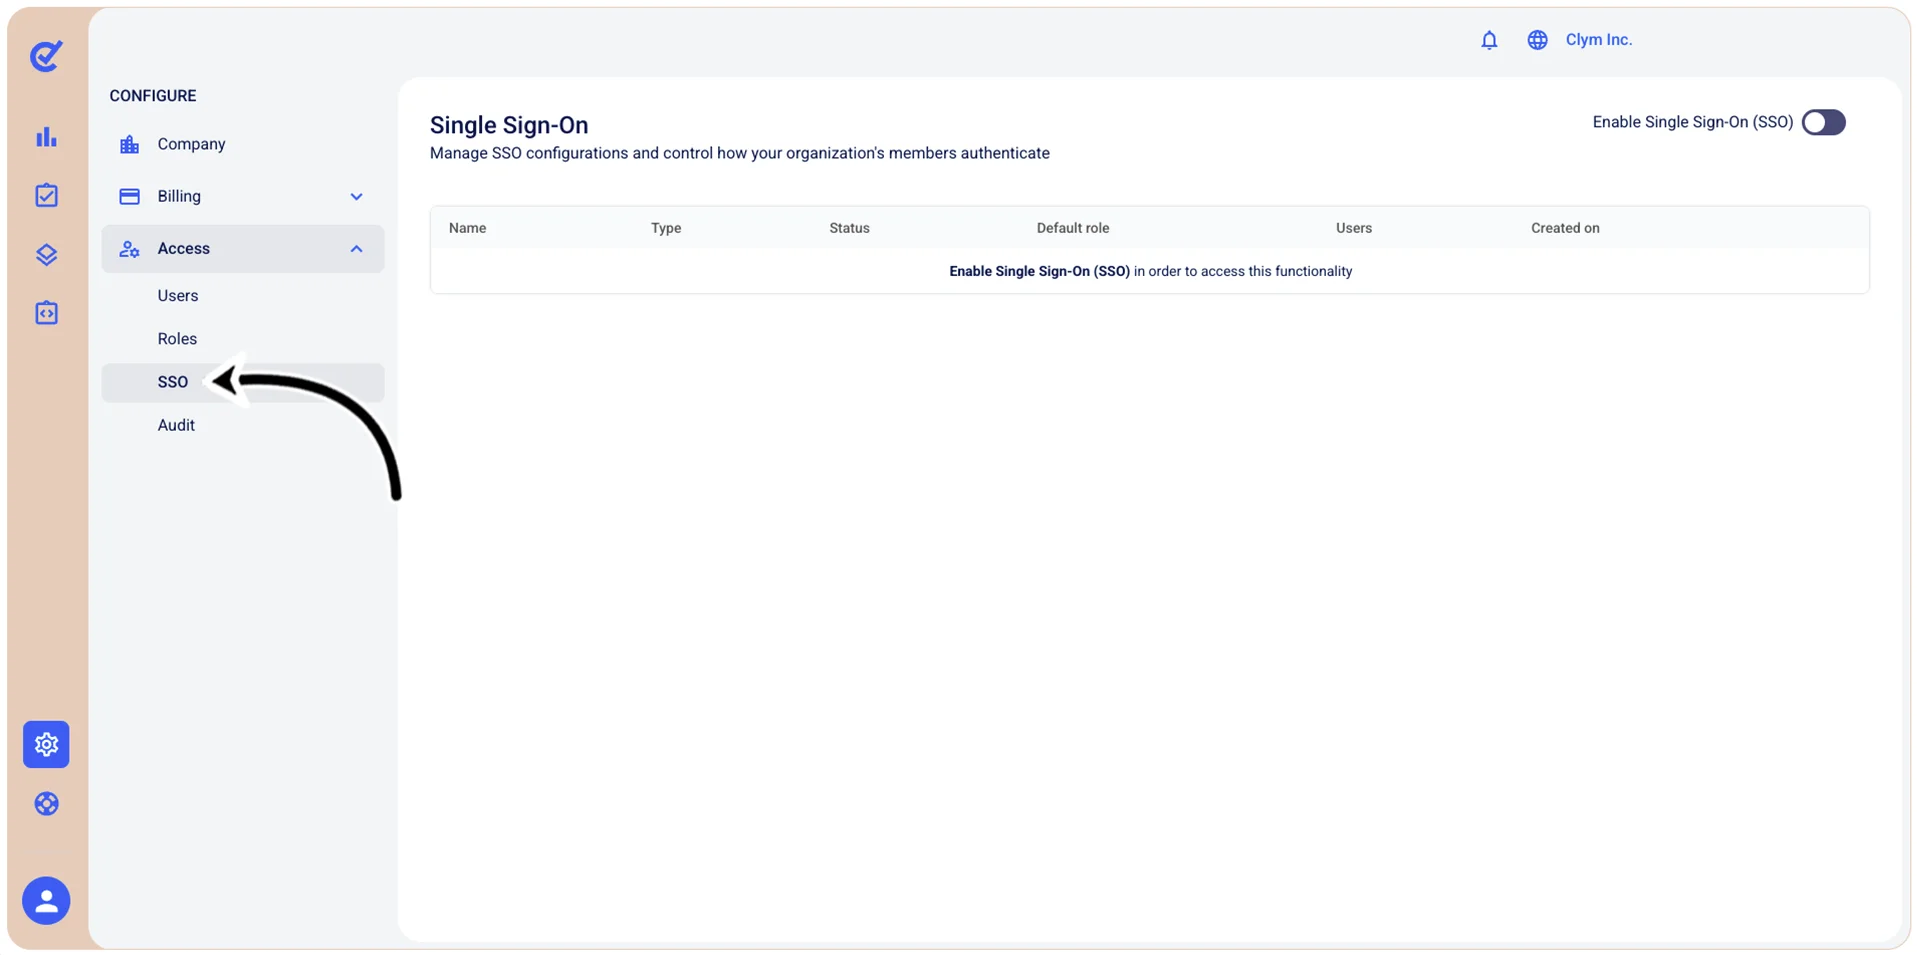
- In the Single Sign-On section, select +Add SSO provider.
- In the Configure SSO provider section, configure the parameters of your OpenID Connect SSO, as follows. Depending on your configuration at this stage, the options available to you may vary.
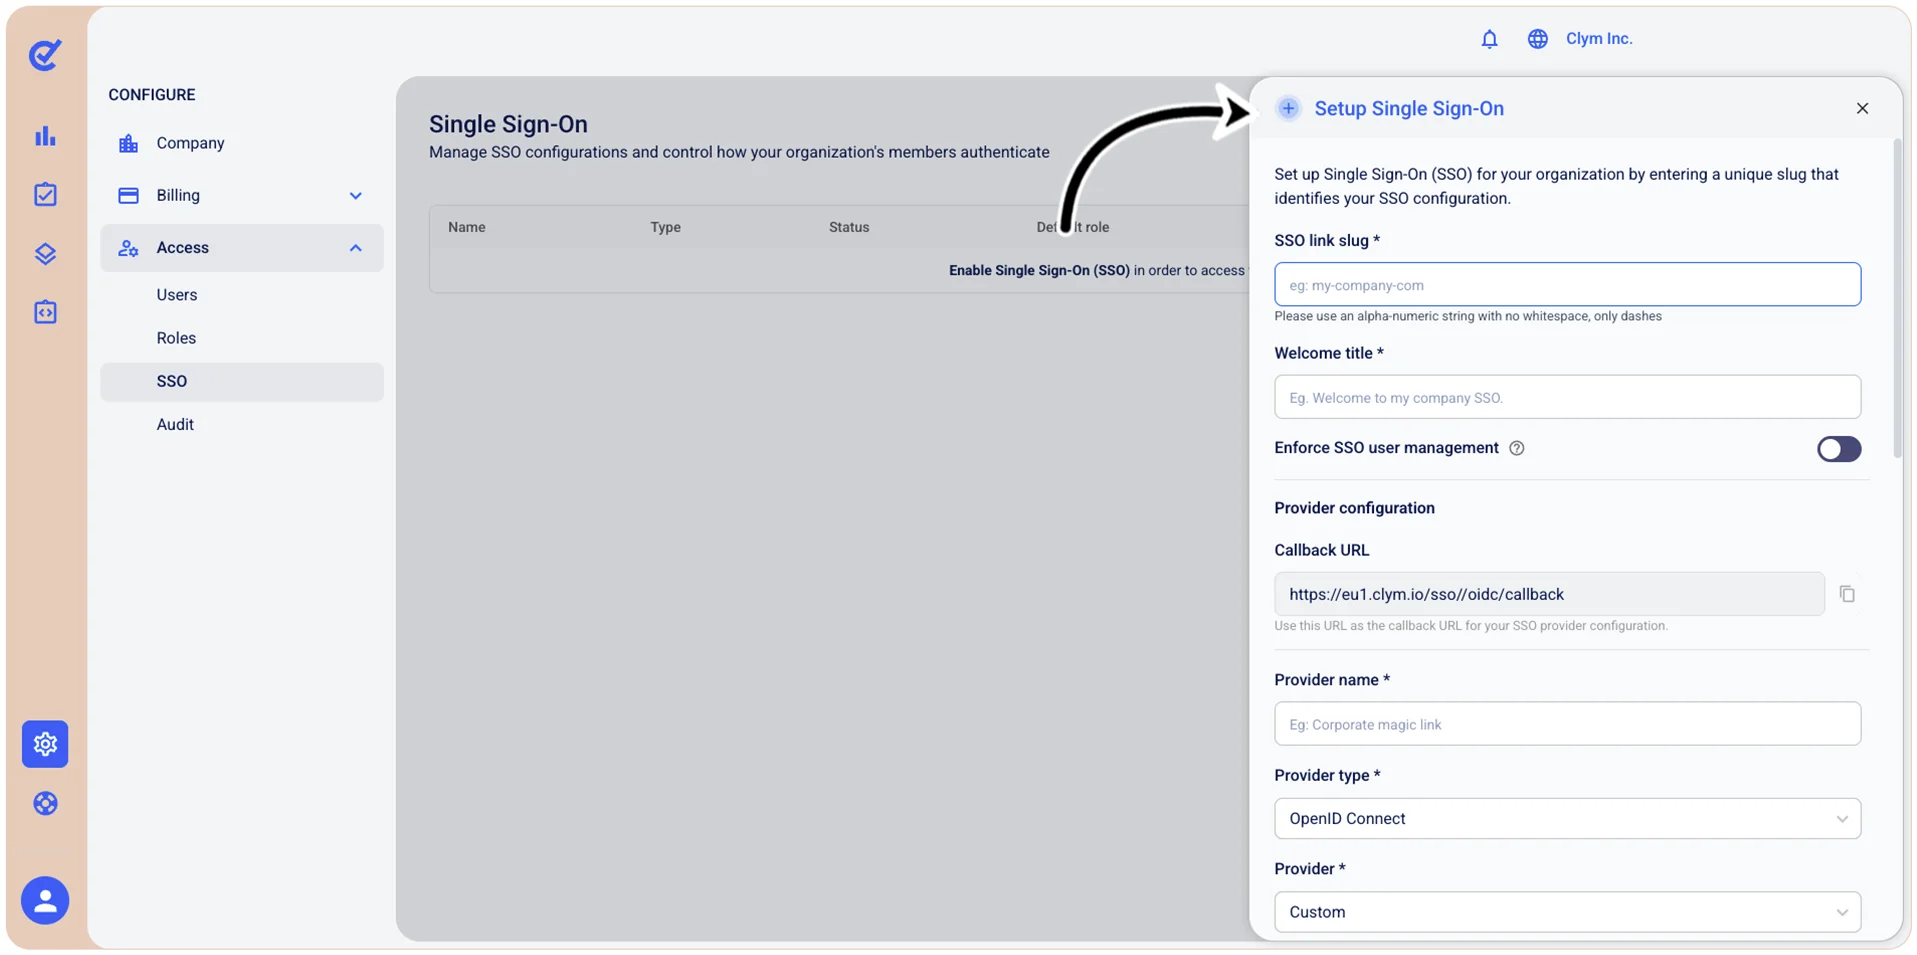
- Callback URL*: Displays the callback URL for your SSO provider configuration. Select Copy to copy it to your clipboard.
- Provider name*: Type the name of your SSO provider.
- Provider type*: Select OpenID Connect as the authentication protocol.
- Provider*: Select the specific identity provider from the list.
- Client ID*: Enter the unique identifier assigned by your identity provider.
- Client secret*: Specify the secret key paired with the Client ID, used to authenticate the connection.
- Select 👁View to reveal/hide the value.
- Scopes*: The permissions requested from the identity provider during authentication. Type each scope and press Enter to add it.
- Issuer*: The base URL of your identity provider (for example, https://<issuername>.com).
- Authorization endpoint*: The URL where users are redirected to log in (for example, https://issuer.com/oauth2/auth).
- Token endpoint*: The URL used to exchange an authorization code for an access token (for example, https://issuer.com/oauth2/token).
- User-info endpoint: The URL used to retrieve profile information about the authenticated user (for example, https://issuer.com/oauth2/userinfo).
- Revocation endpoint: The URL used to revoke tokens when a user logs out (for example, https://issuer.com/oauth2/token/revoke).
- JWKS endpoint: The URL that provides the public keys used to verify tokens issued by the identity provider (for example, https://issuer.com/oauth2/jwks.json).
- Allowed domains*: Type the domain(s) the users of which can log in using the SSO you are configuring.
- Session duration: Define how long a user's SSO session remains active before they must re-authenticate.
- Auto-provision users: When toggled on, all user accounts can automatically log in using SSO and will have the user rights you configure as the Default role (see below). When deactivated, only manually created user accounts can log in.
- Default role: Select from the list the default role that will be assigned to auto-provisioned users. The role you select here will determine the user rights.
- When finished, select Add.
Add an SAML 2.0 SSO provider
In the Control Center, you can easily activate SSO using SAML 2.0.
Note: To be able to add an SSO provider, you need to have already configured the SSO parameters.
To add an SAML 2.0 SSO:
- Go to Configure>Access>SSO.
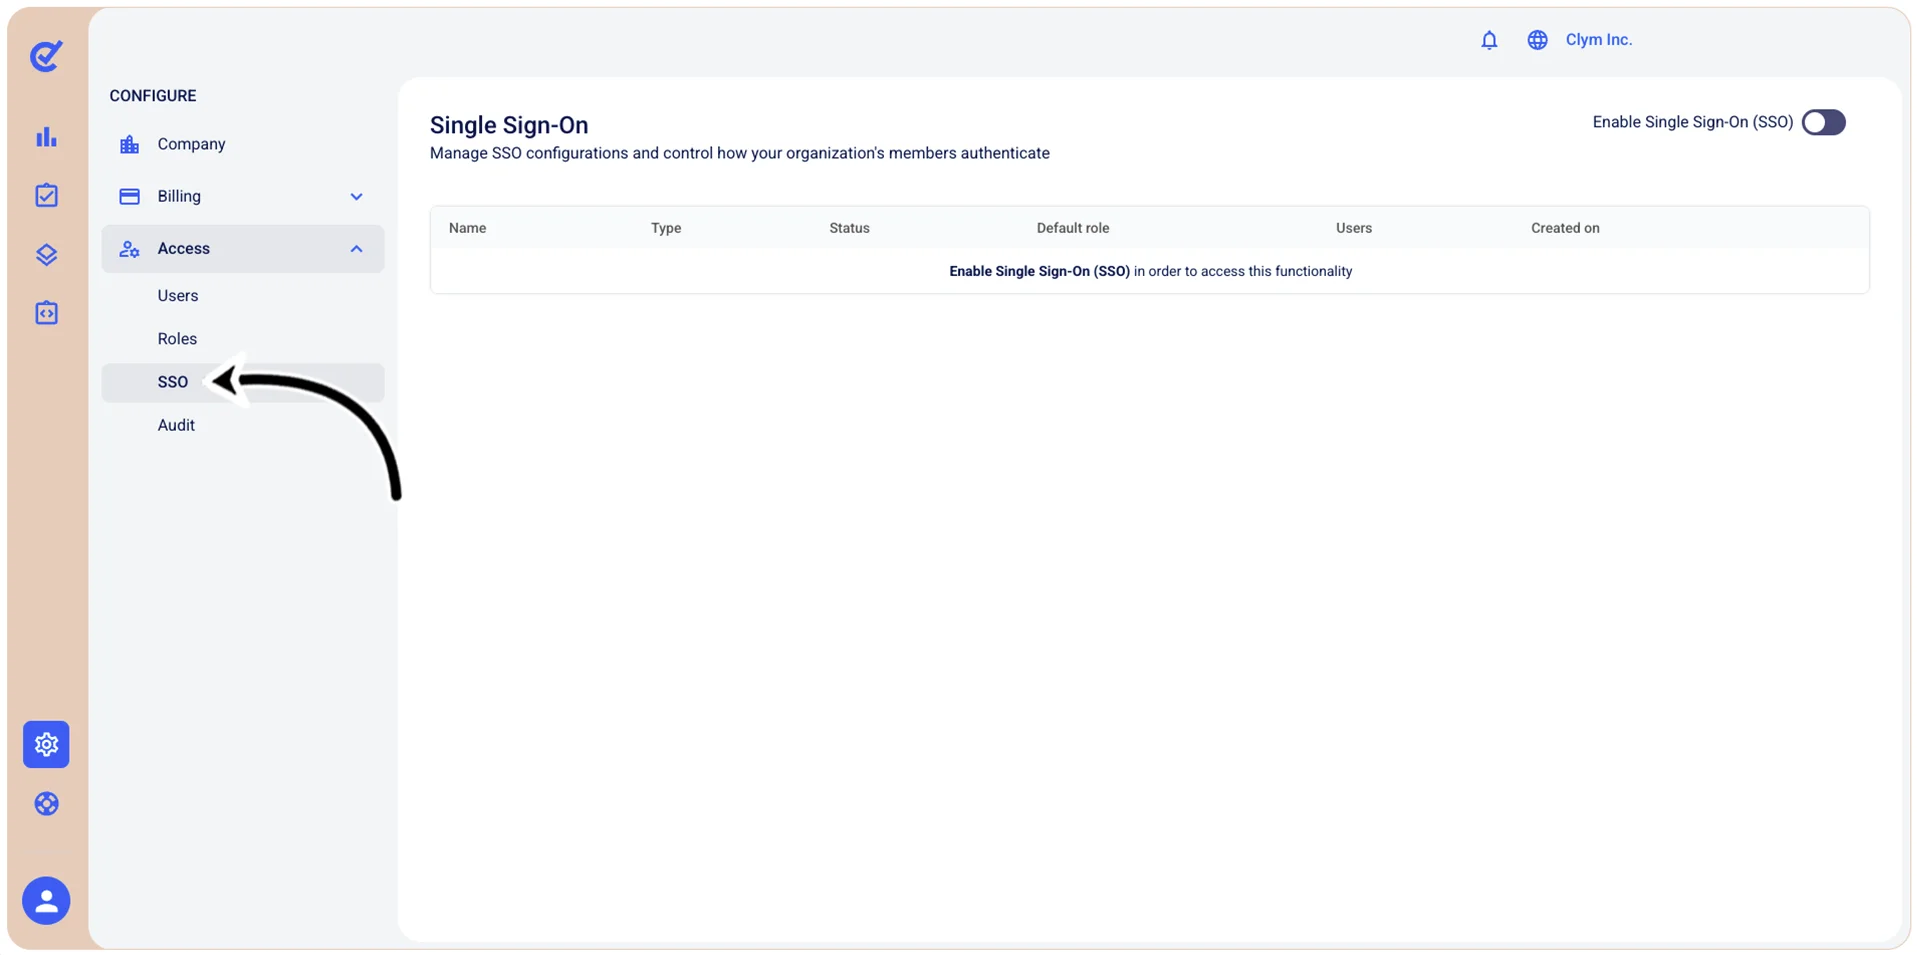
- In the Single Sign-On section, select +Add SSO provider.
- In the Configure SSO provider section, configure the parameters of your SAML 2.0, as follows. Depending on your configuration at this stage, the options available to you may vary.
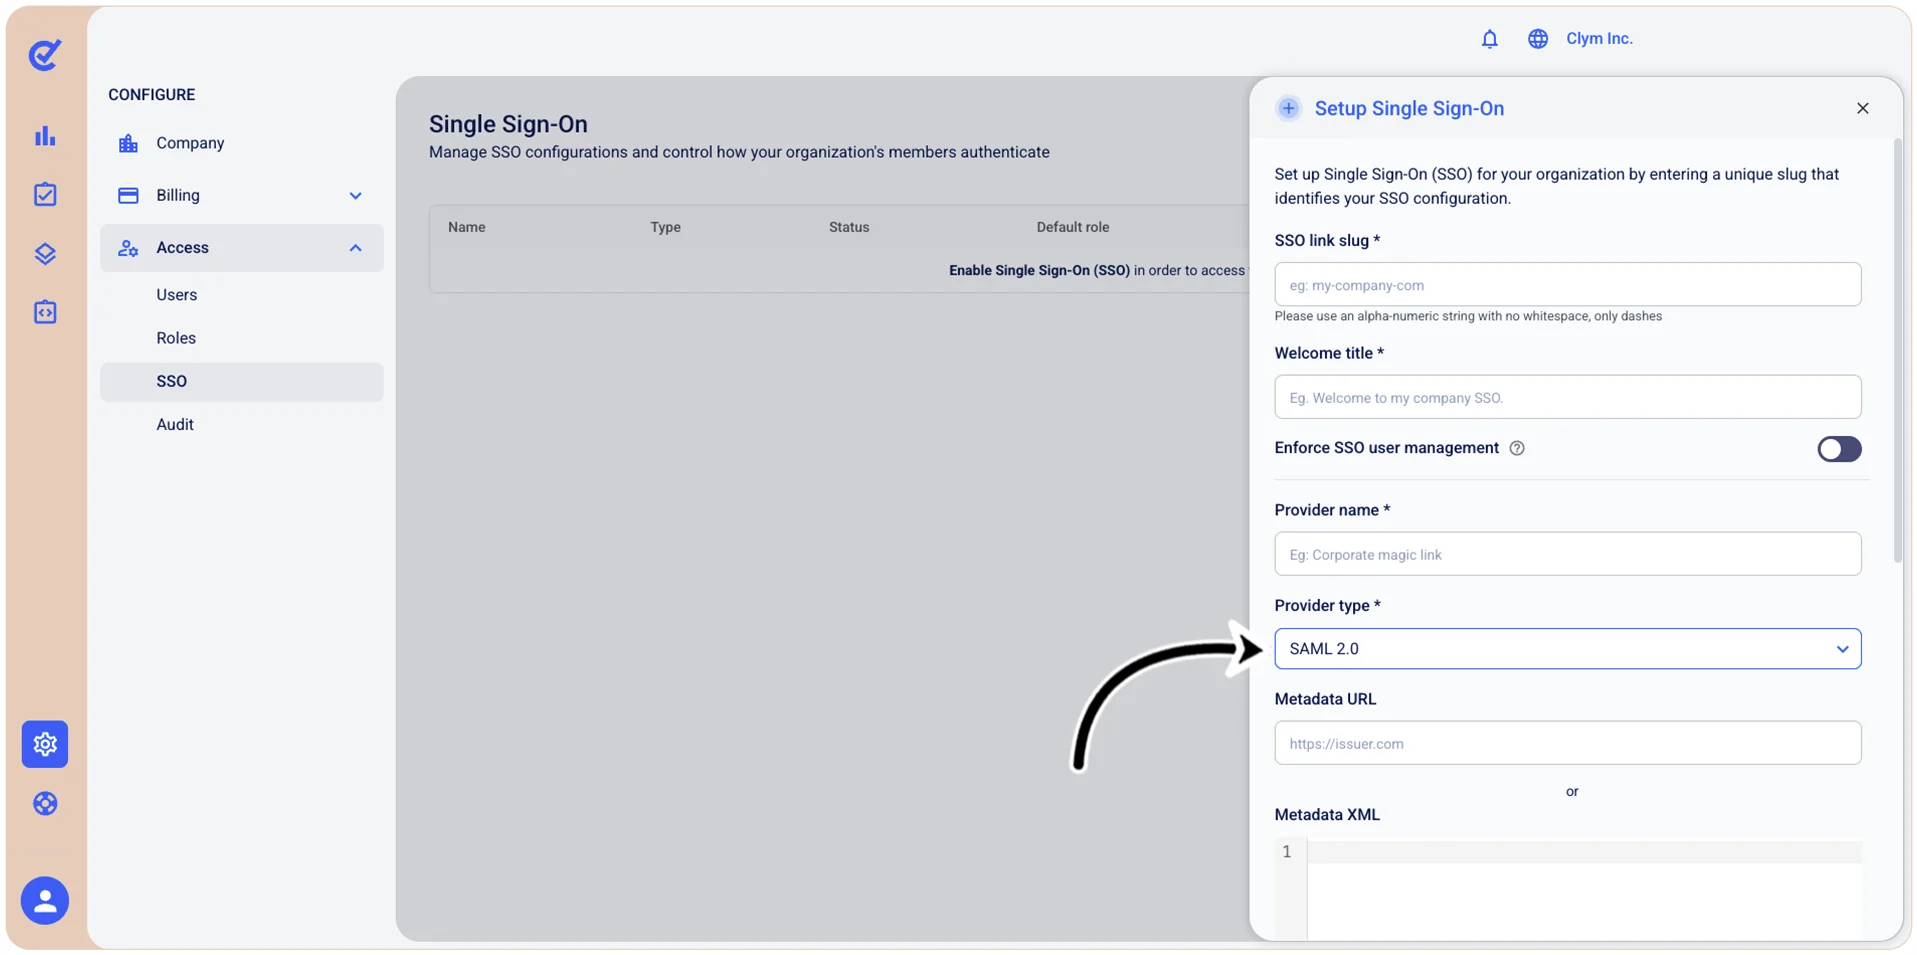
- Callback URL*: Displays the callback URL for your SSO provider configuration. Select Copy to copy it to your clipboard.
- Provider type*: Select SAML 2.0. as the authentication protocol.
- Metadata URL: Enter the URL pointing to your identity provider's SAML metadata file (for example, https://issuer.com). Use this or the Metadata XML field below.
- Metadata XML: If your identity provider does not expose a metadata URL, paste the raw SAML metadata XML directly into this field. Use this or the Metadata URL field above.
- Custom attribute mapping: Provide a JSON file with custom attribute mapping.
- Provide custom certificates: When toggled on, it enables you to supply your own X.509 certificate and private key for signing and encrypting SAML assertions (see below).
- X.509 certificate: Paste your X.509 public certificate used to verify the identity of your service during SAML exchanges.
- X.509 private key: Paste your X.509 private key used to sign outgoing SAML requests.
- If you selected Magic link as a Provider type:
- Default role: Select from the list the default role that will be assigned to auto-provisioned users. The role you select here will determine the user rights. The roles available here are the ones you configured at Manage Roles.
- Allowed domains*: Type the domain(s) the users of which can log in using the SSO you are configuring.
- Session duration: Define how long a user's SSO session remains active before they must re-authenticate.
- When finished, select Setup to save your configuration.
Add a Magic link SSO provider
In the Control Center, you can easily activate SSO using Magic link.
Note: To be able to add an SSO provider, you need to have already configured the SSO parameters.
To add a Magic link SSO:
- Go to Configure>Access>SSO.
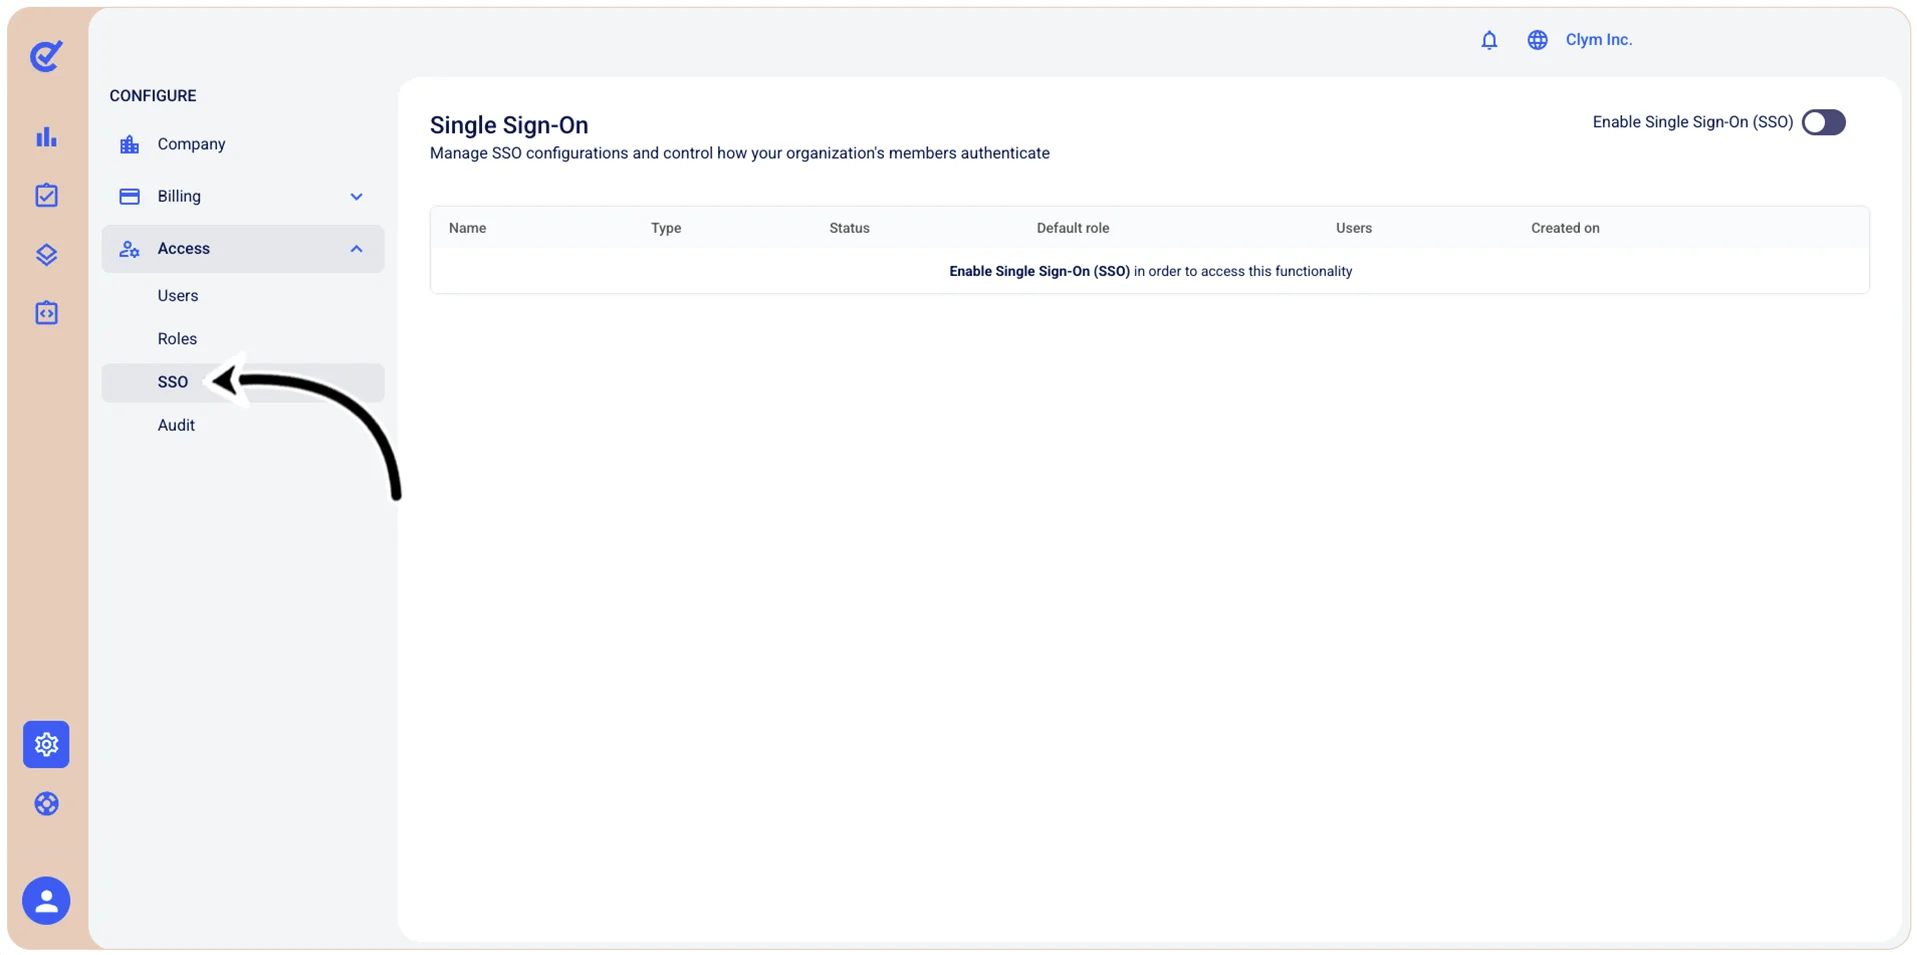
- In the Single Sign-On section, select +Add SSO provider.
- In the Configure SSO provider section, configure the parameters of your Magic link, as follows. Depending on your configuration at this stage, the options available to you may vary.
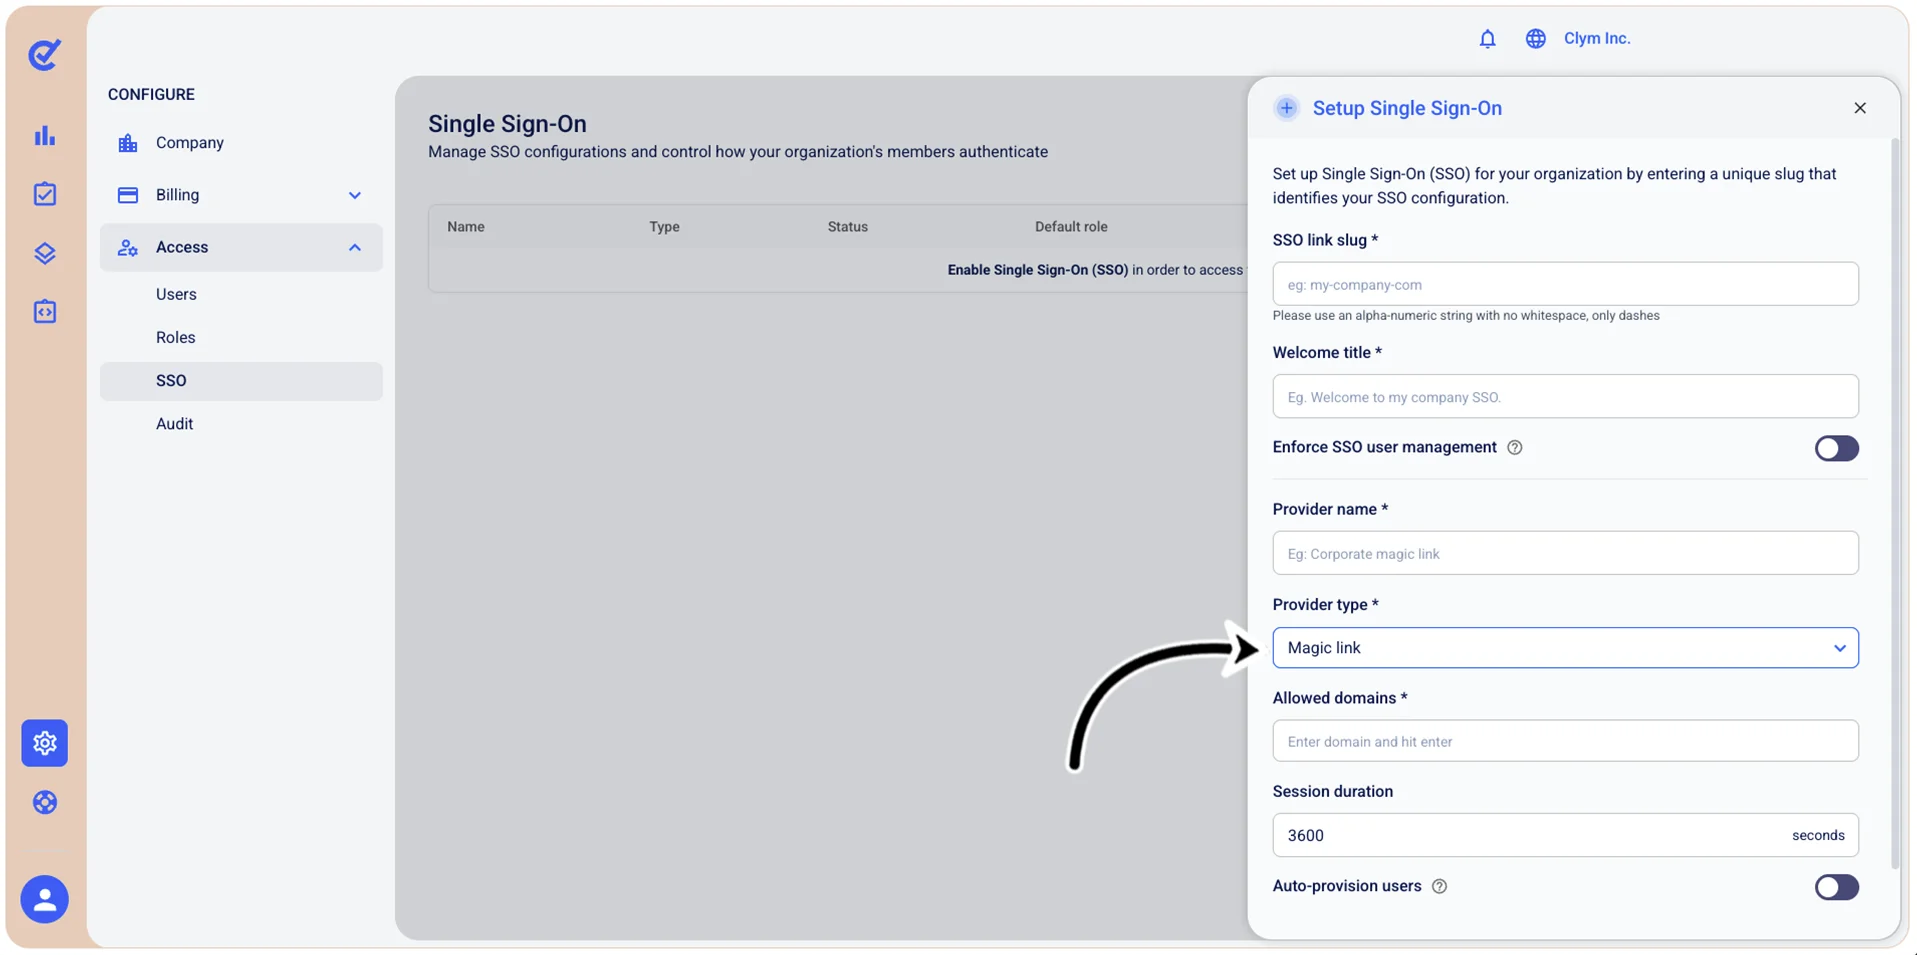
- Provider name*: Type the name of your SSO provider.
- Provider type*: Select the authentication protocol used by your identity provider from the list: OpenID Connect, SAML 2.0, Magic link.
- Allowed domains*: Type the domain(s) the users of which can log in using the SSO you are configuring.
- Session duration: Define how long a user's SSO session remains active before they must re-authenticate.
- Auto-provision users: When toggled on, all user accounts can automatically log in using SSO and will have the user rights you configure as the Default role (see below). When deactivated, only manually created user accounts can log in.
- Default role: Select from the list the default role that will be assigned to auto-provisioned users. The role you select here will determine the user rights. The roles available here are the ones you configured at Manage Roles.
- When finished, select Setup to save your configuration.
Modify an SSO provider/configuration: OpenID Connect, SAML 2.0, Magic link
In the Control Center, you can easily edit the parameters of your SSO configuration.
To modify an SSO configuration:
- Go to Configure>Access>SSO.
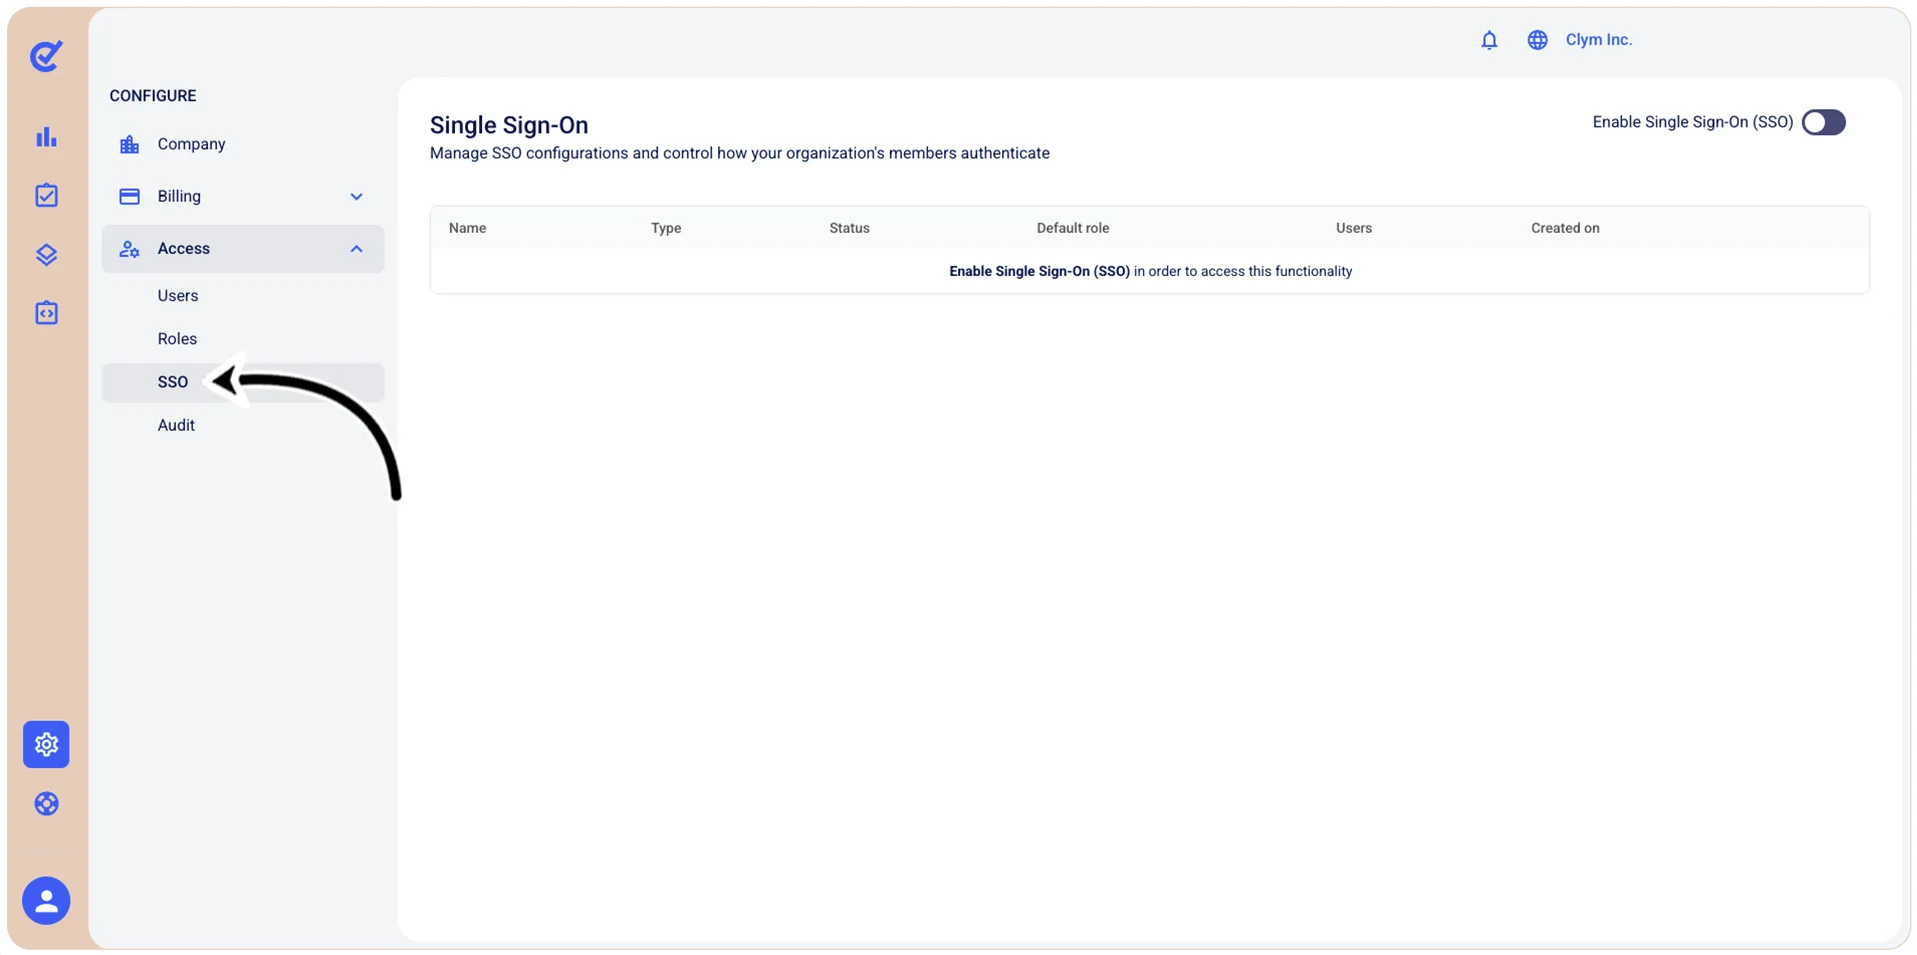
- In the Single Sign-On section, select ⋮ Settings next to the desired SSO configuration. On the shortcut menu, point to Change configuration.
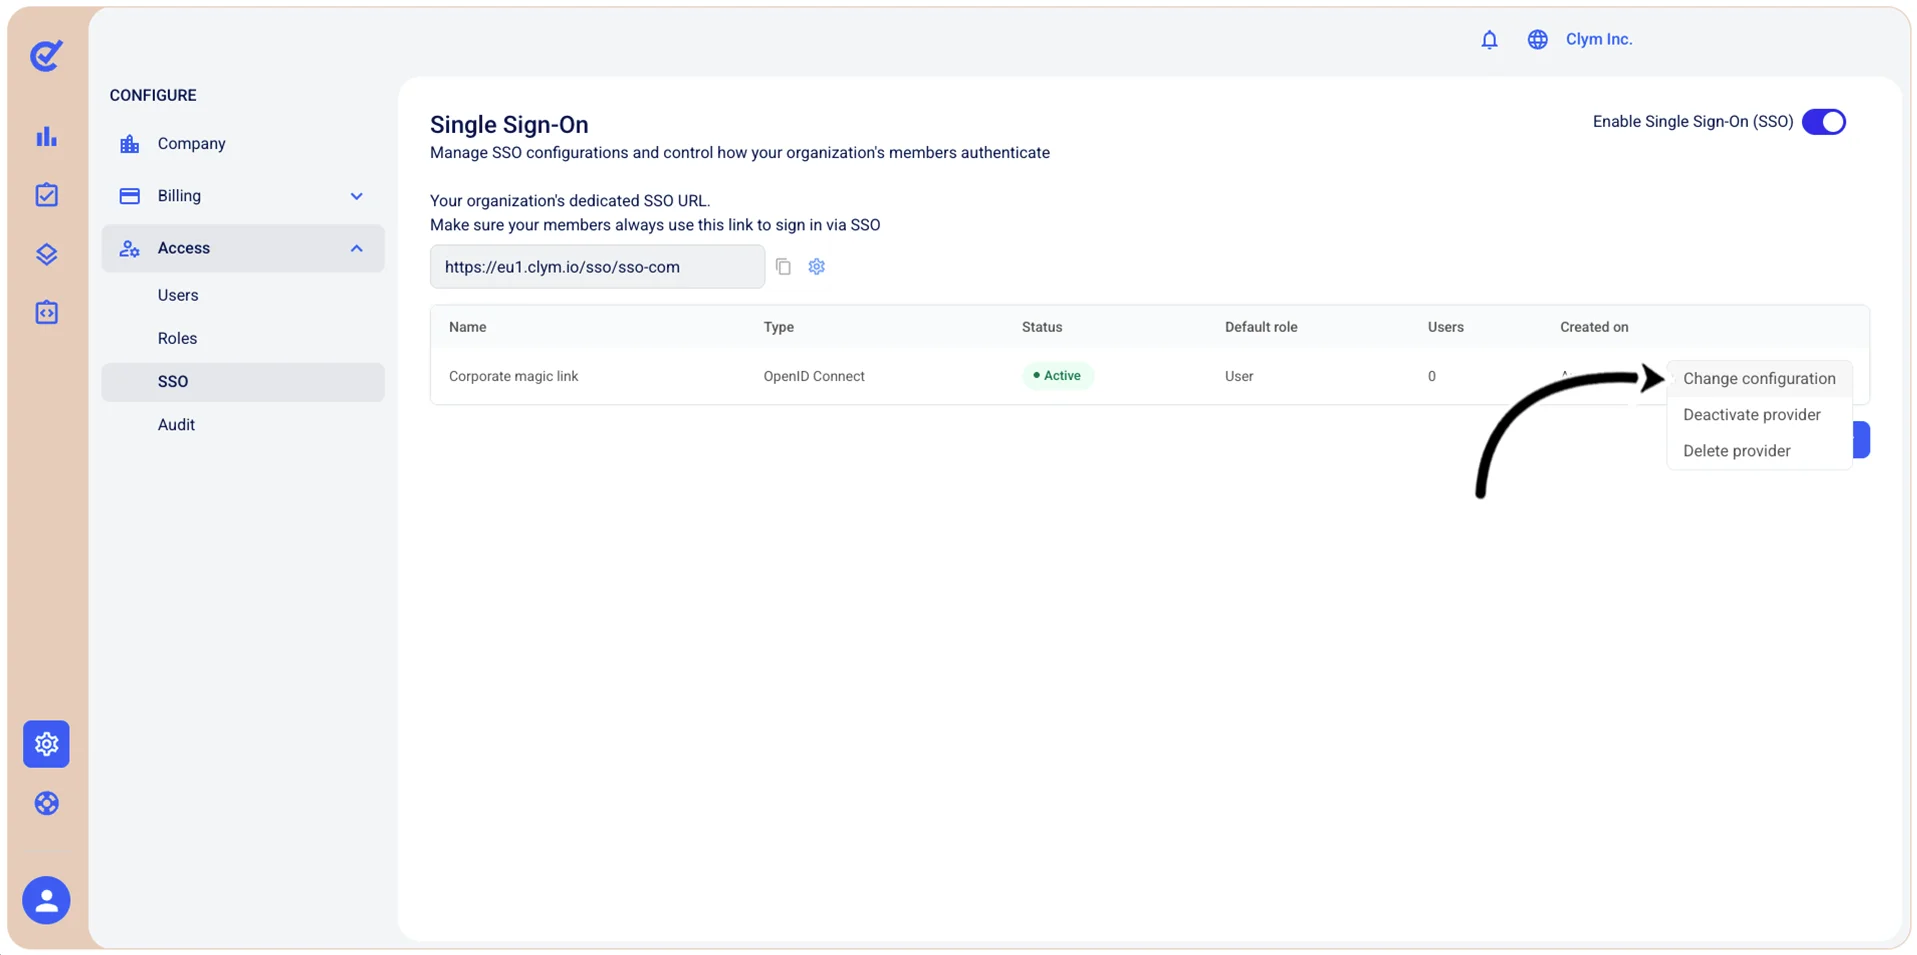
- Next, proceed to modify the SSO parameters accordingly.
Deactivate/Activate an SSO provider: OpenID Connect, SAML 2.0, Magic link
In the Control Center, you can easily deactivate/reactivate an SSO provider.
To deactivate/reactivate an SSO provider:
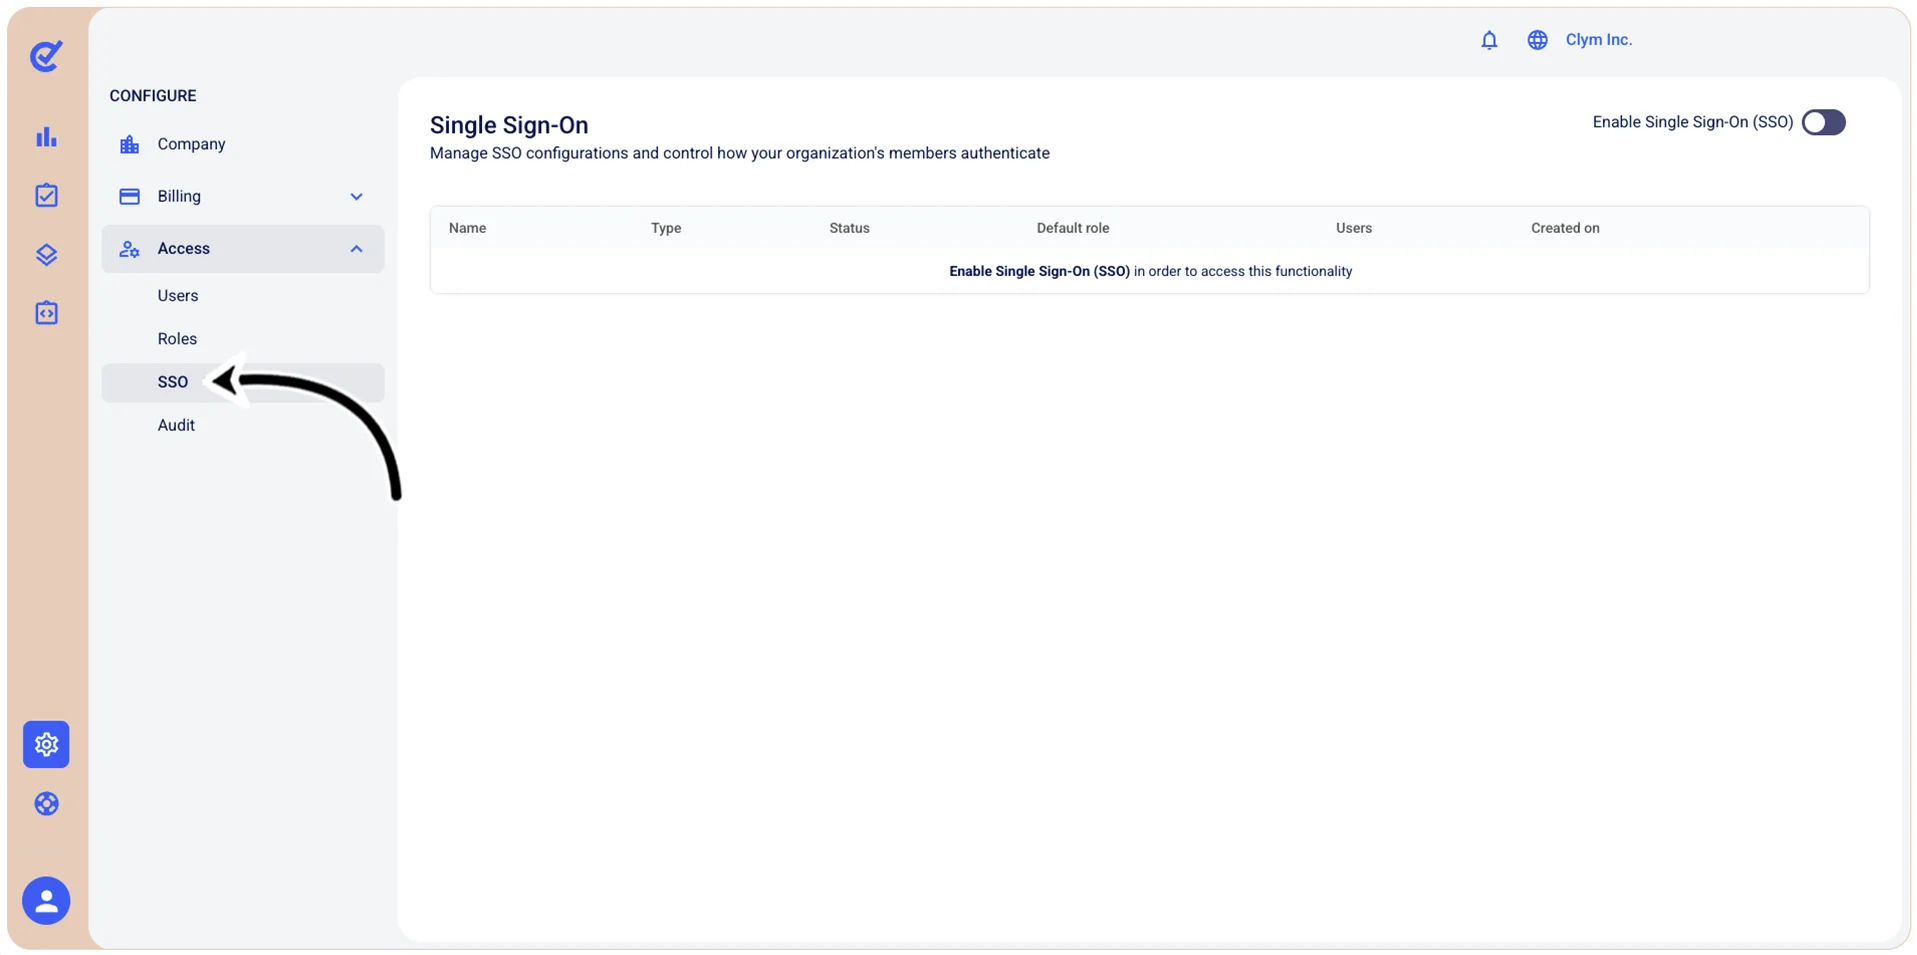
- Go to Configure>Access>SSO.
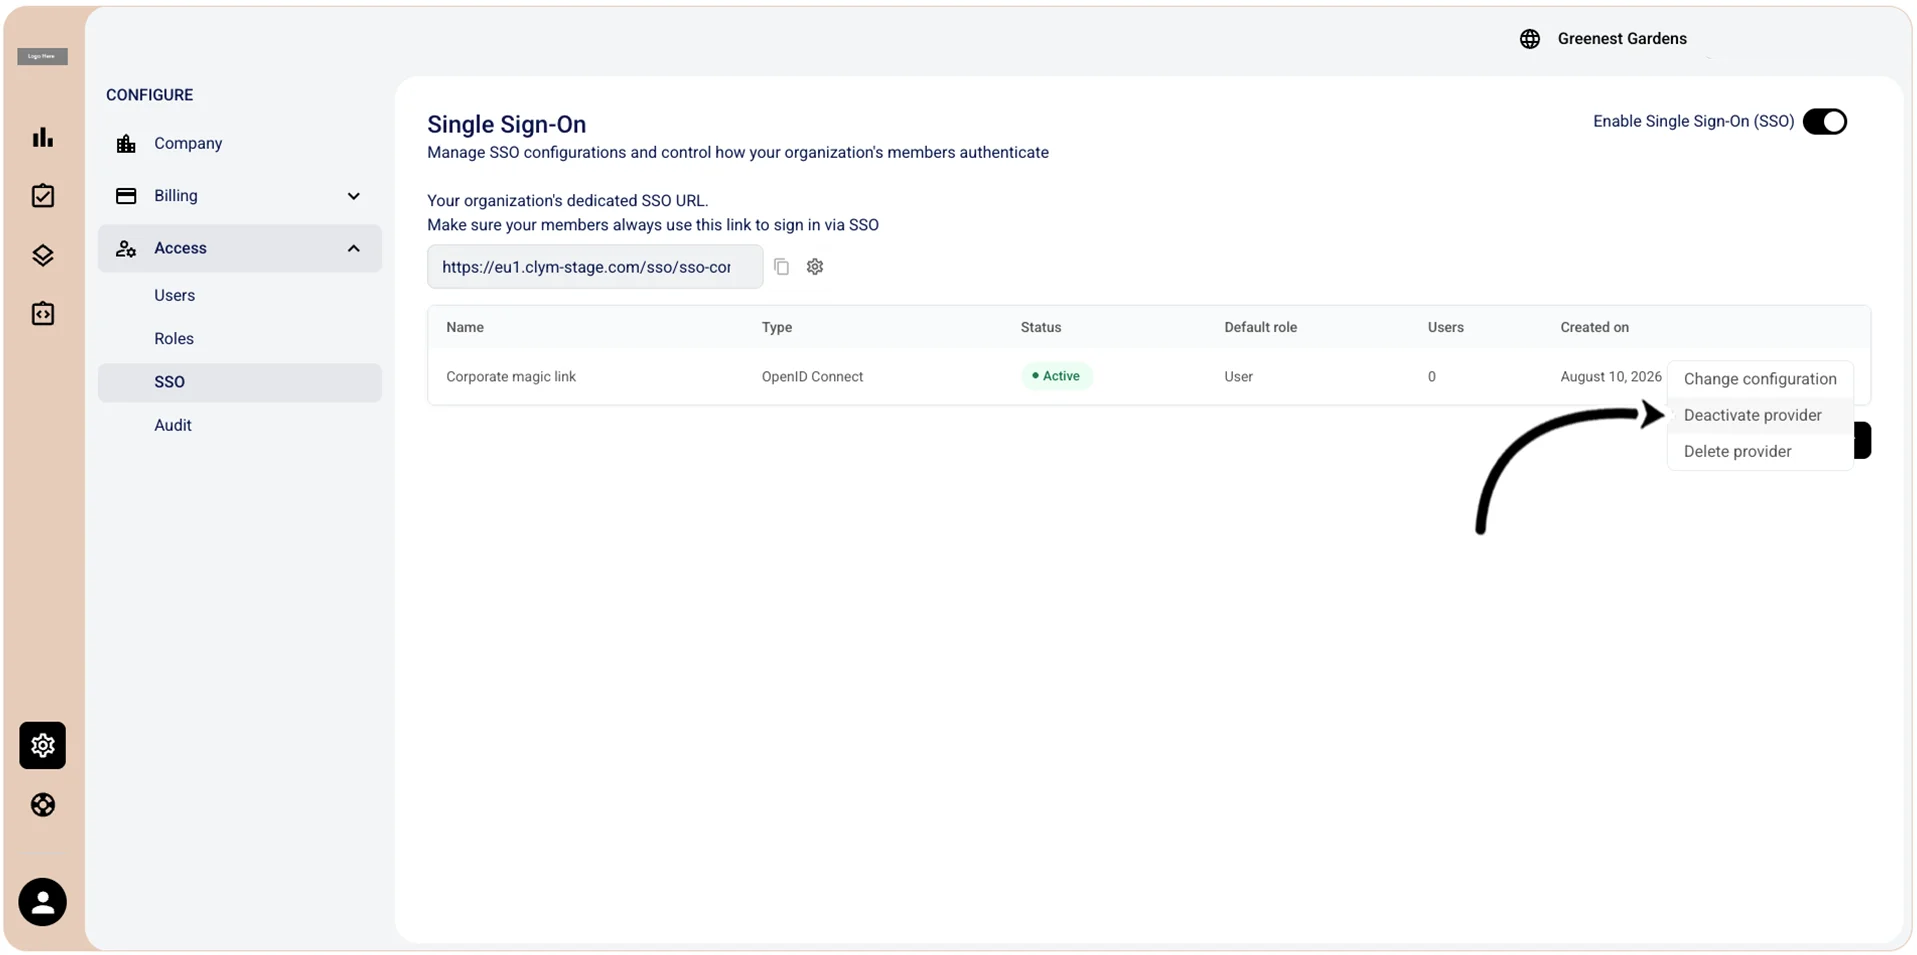
- In the Single Sign-On section, select ⋮ Settings next to the desired SSO configuration. On the shortcut menu, point to Deactivate provider for an active provider or Activate provider for an inactive provider.
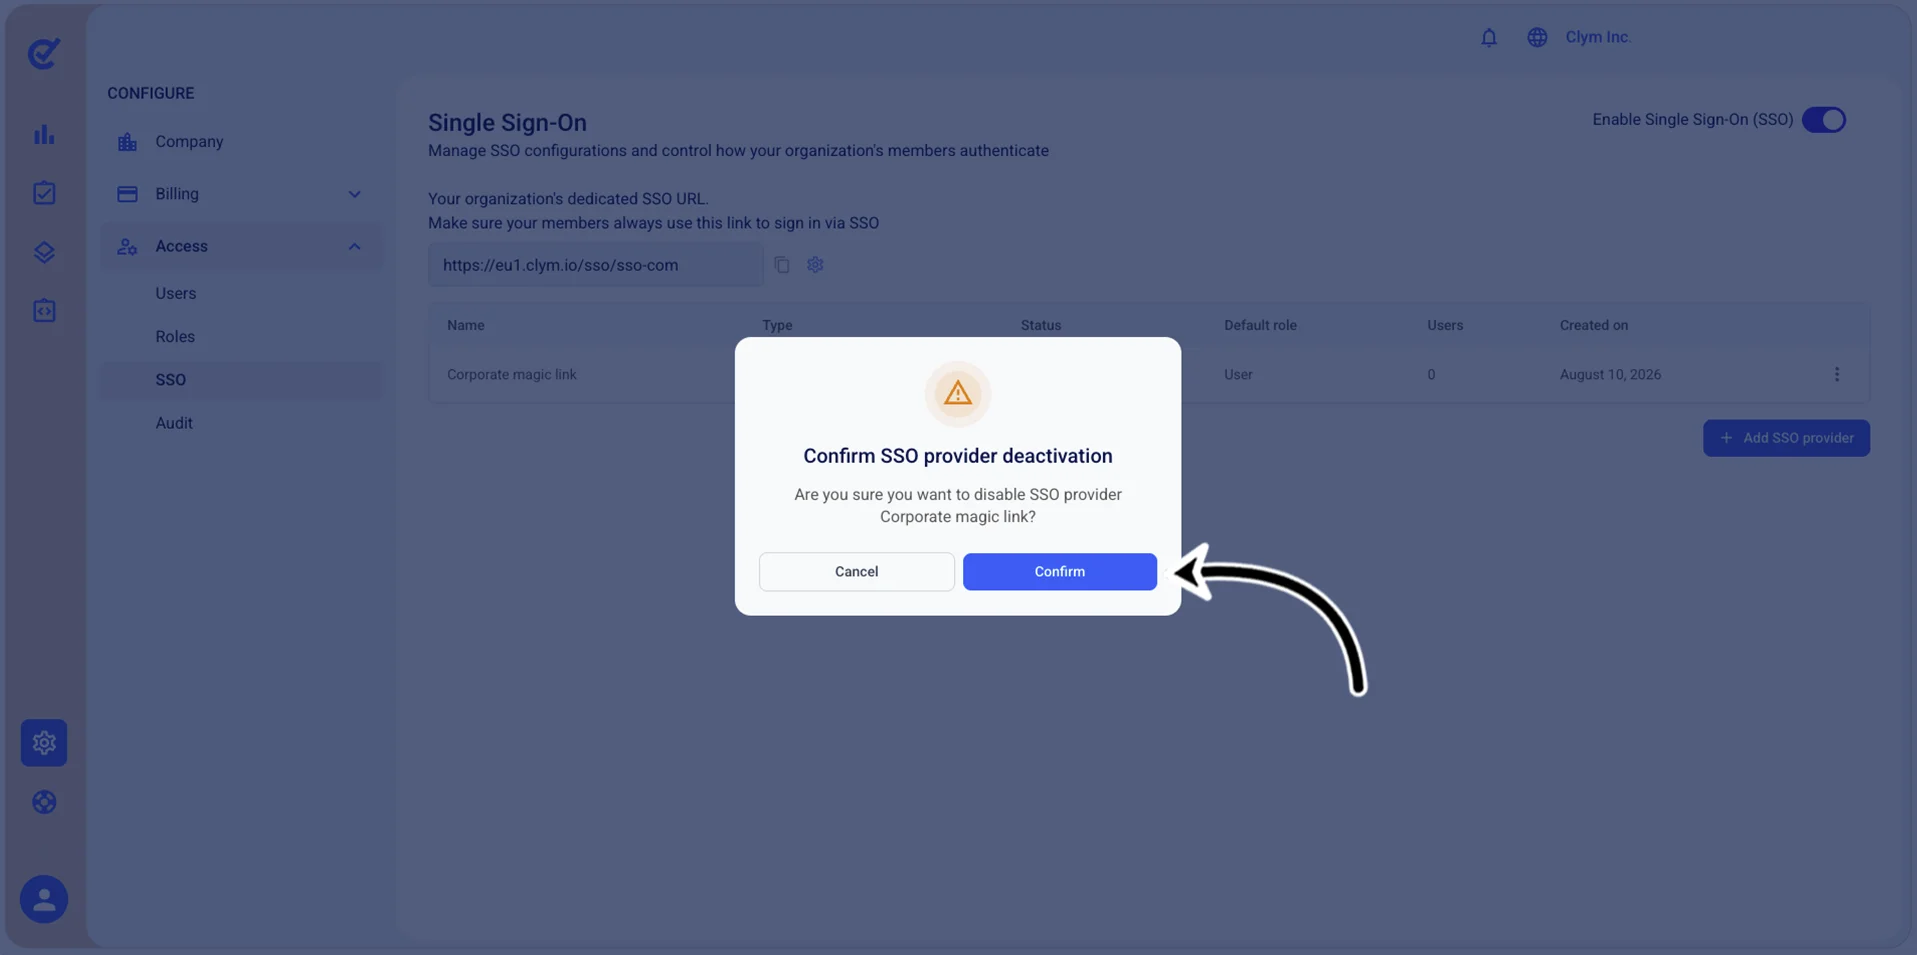
- In the confirmation message, select Confirm.
Delete an SSO provider: OpenID Connect, SAML 2.0, Magic link
To delete an SSO provider:
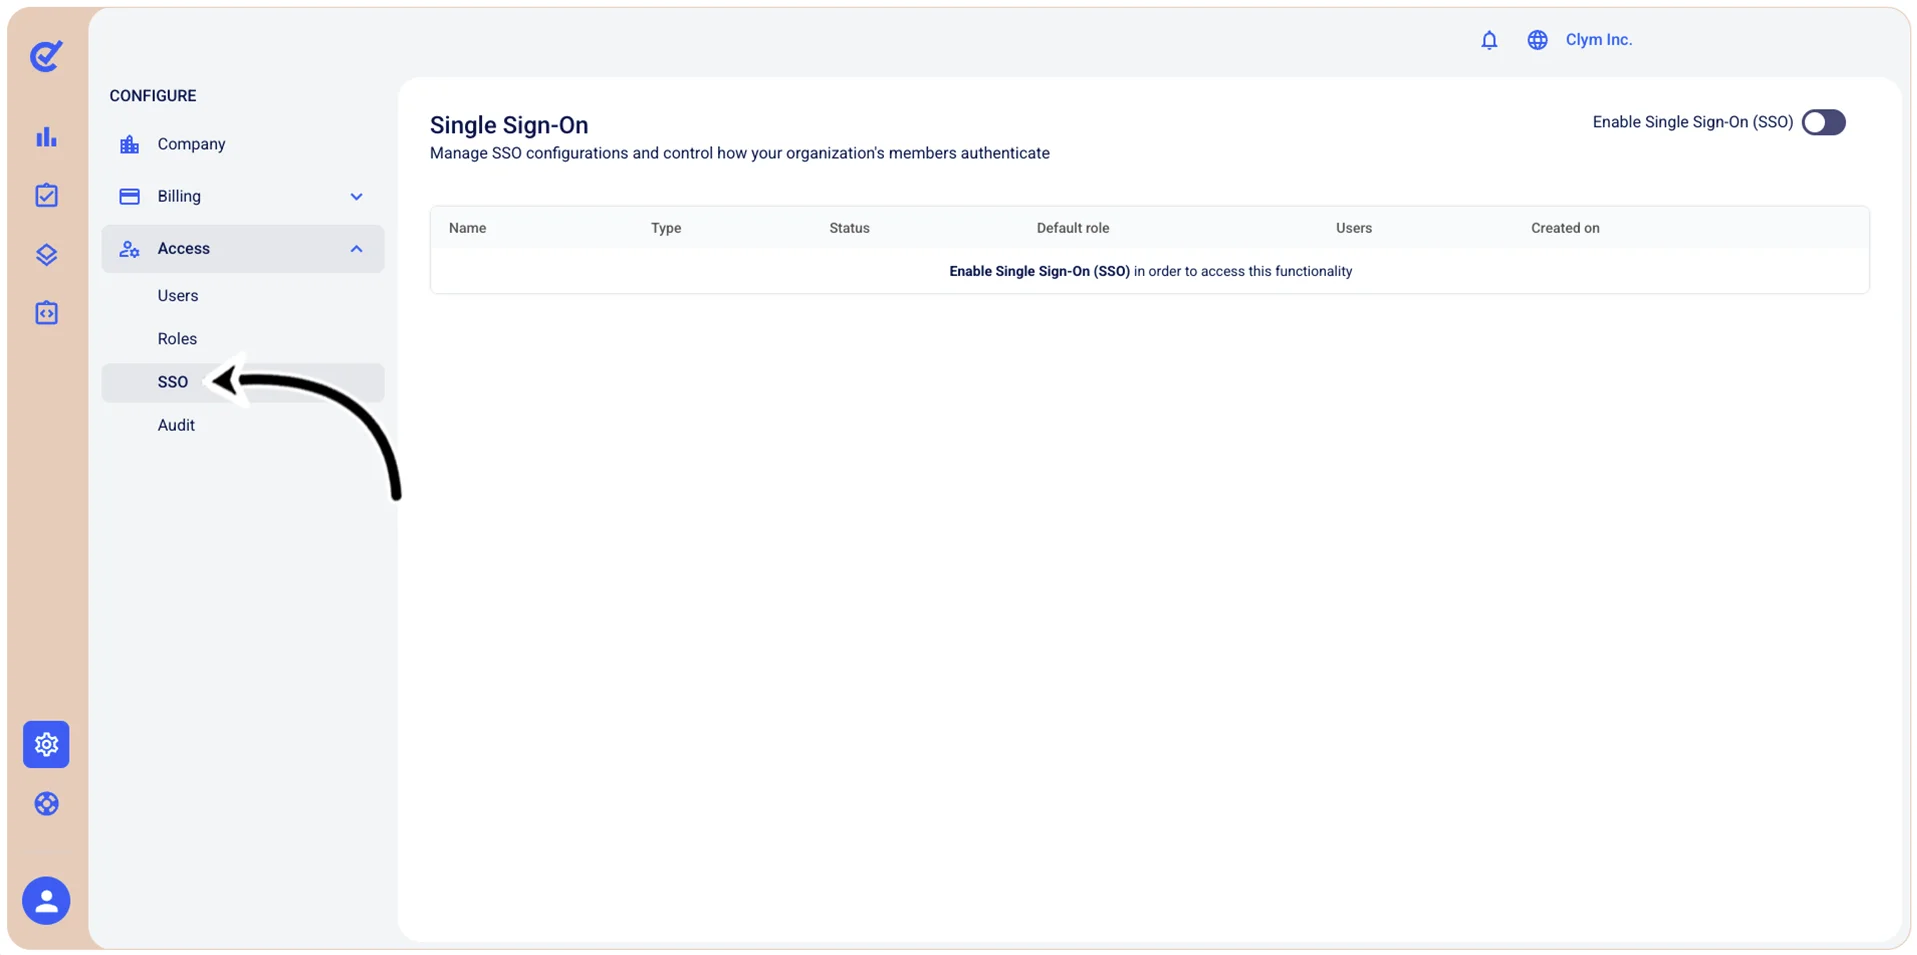
- Go to Configure>Access>SSO.
- In the Single Sign-On section, select ⋮ Settings next to the desired SSO configuration. On the shortcut menu, point to Delete provider.
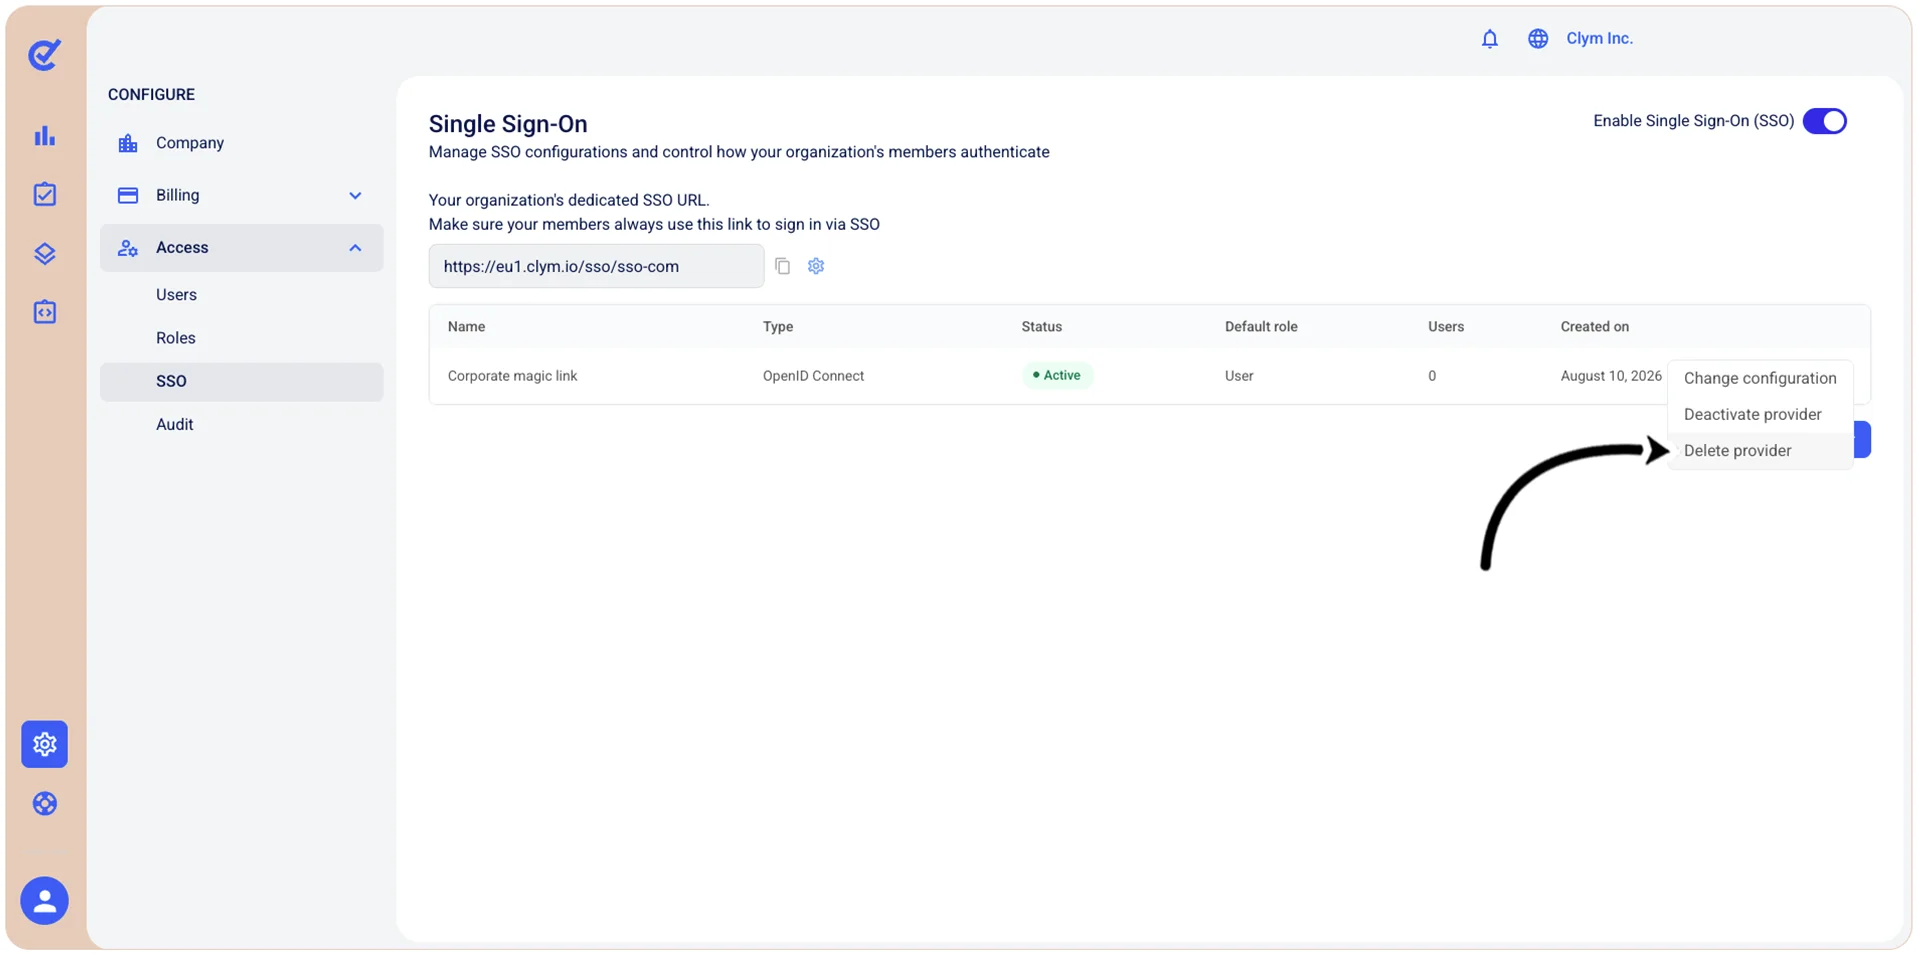
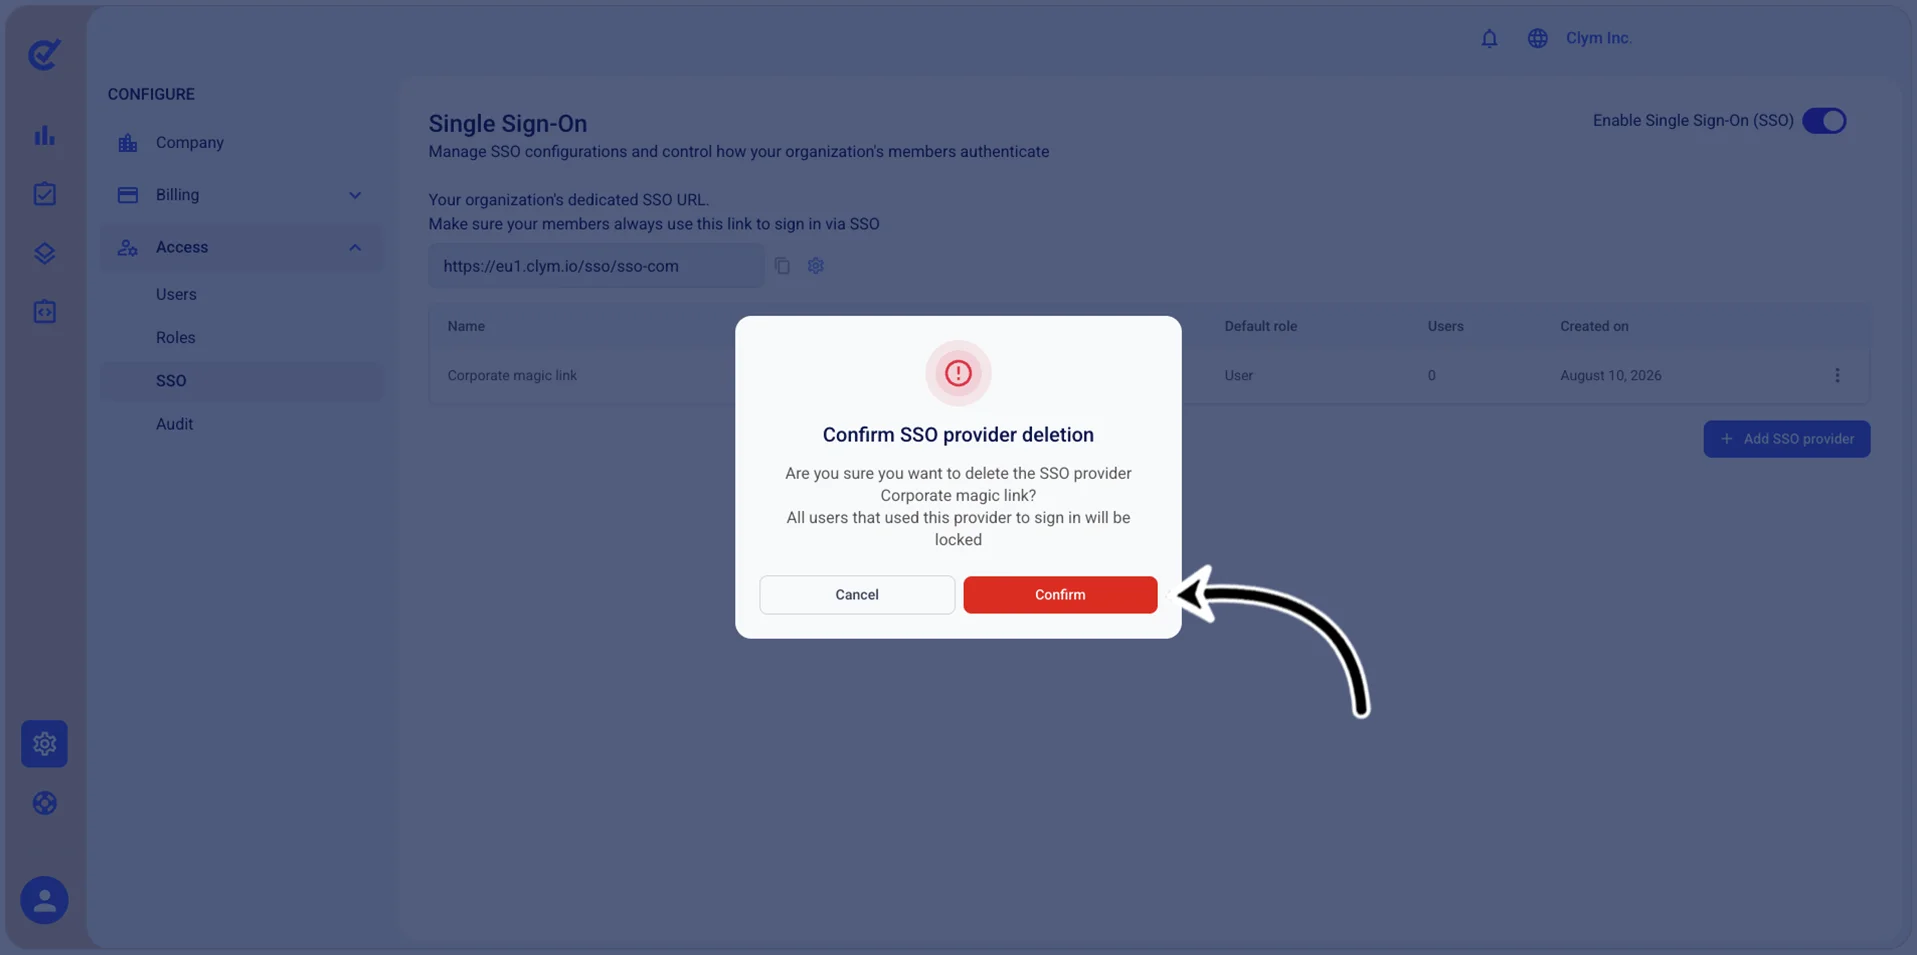
- In the confirmation message, select Confirm.